Honda CT90 Spark Advancer Assembly Build-Up
When someone picks up their first CT90 (and they will soon find its hard to own just one...) and its a barn find that doesn't want to run, one of the things they tend to overlook in trying to get the bike running is the spark advancer. On most older CT90's that haven't been run in a number of years, the spark advancer is usually frozen solid due to corrosion or dried grease and this prevents the bike from running well at anything other than idle.
I was in the process of building up an engine for one of my project bikes and had to go through and clean up the spark advancer, so I thought I would share some detailed photos of the spark advancer assembly and the process for building it back up.
While I don't plan on providing any details on how to get an old spark advancer assembly apart and clean, I will offer up that solvent, penetrating oil, and a lot of patience will eventually do the trick.
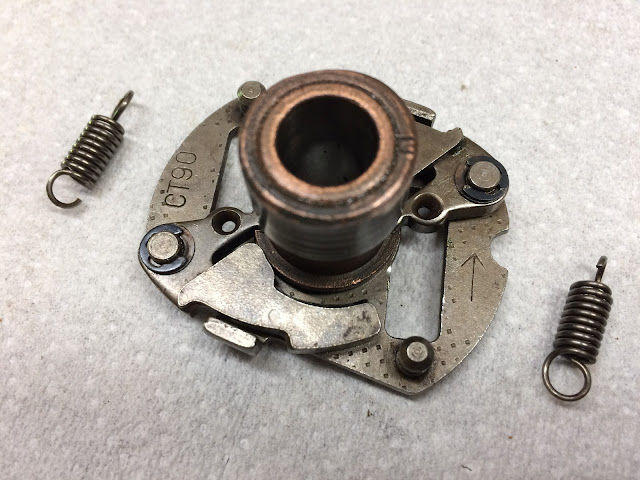
Here is a shot of a clean and assembled CT90 spark advancer. There are a couple of different configurations used on the CT90 and I will show another configuration further along in this post, but the one below is typical for a CT90.

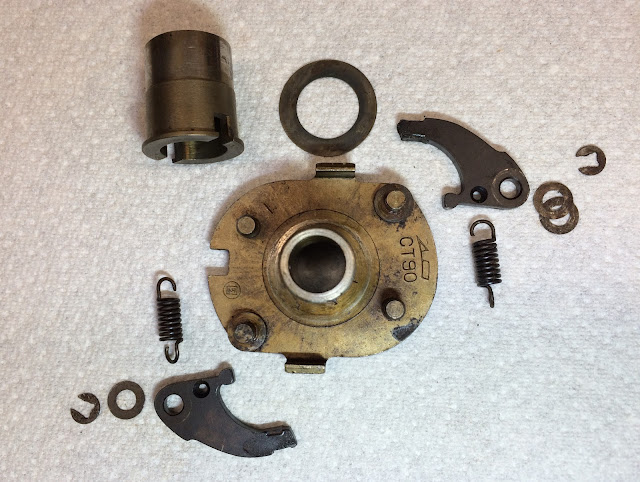
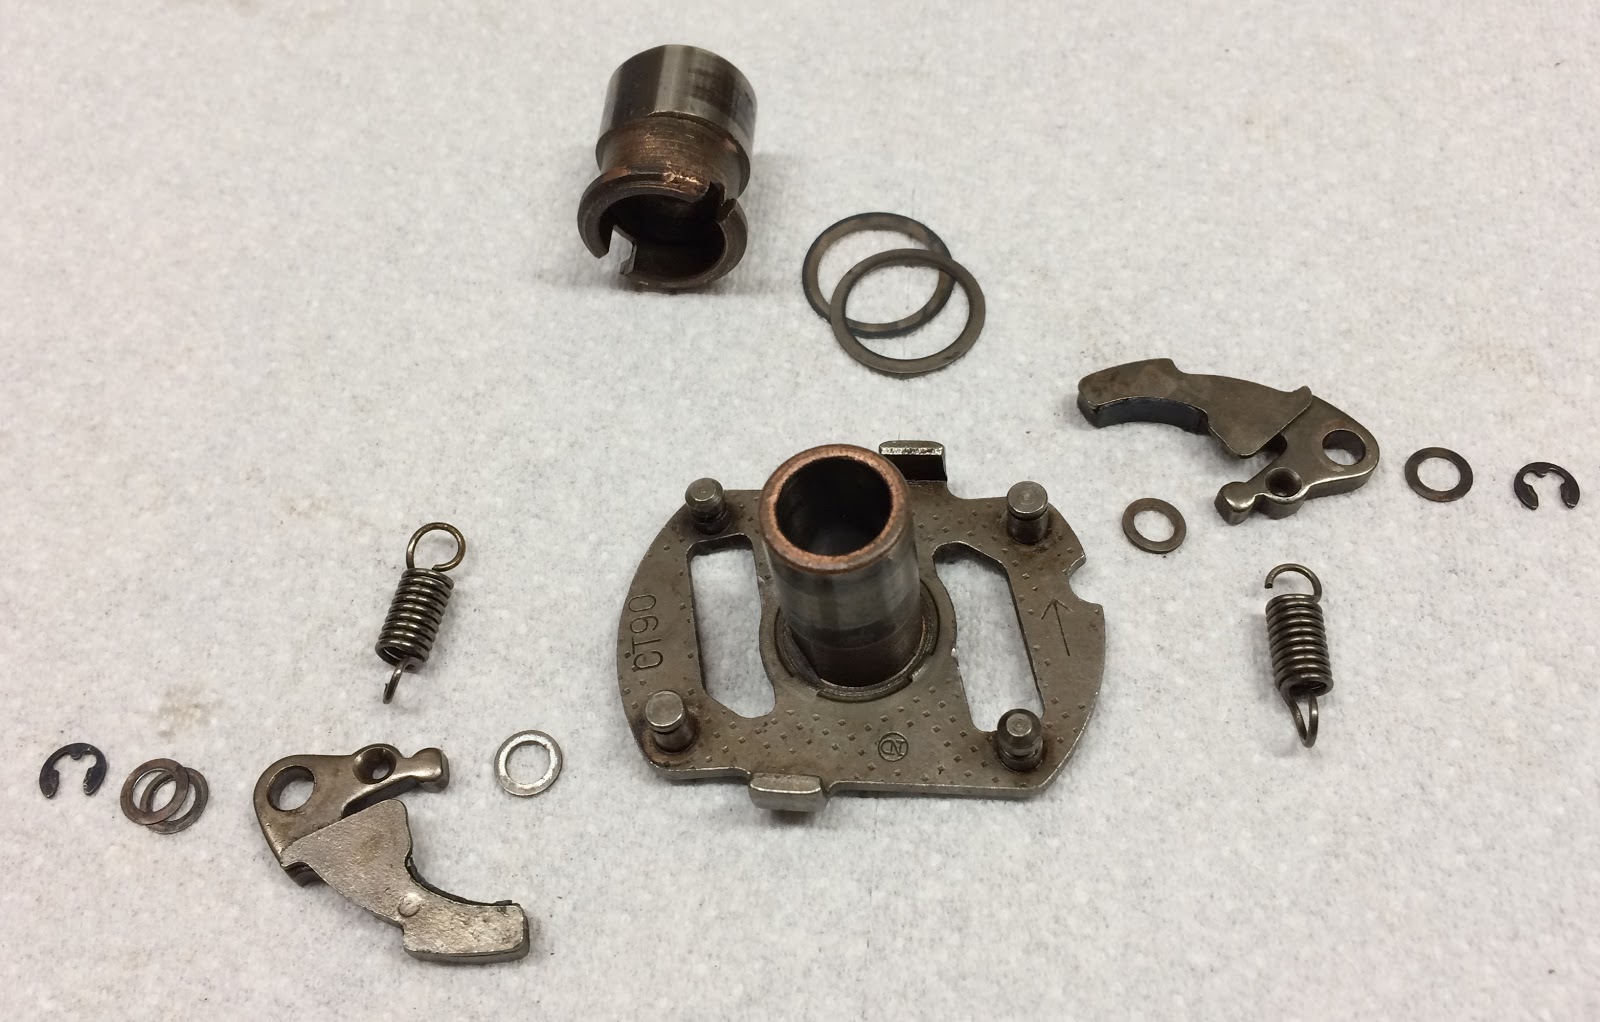
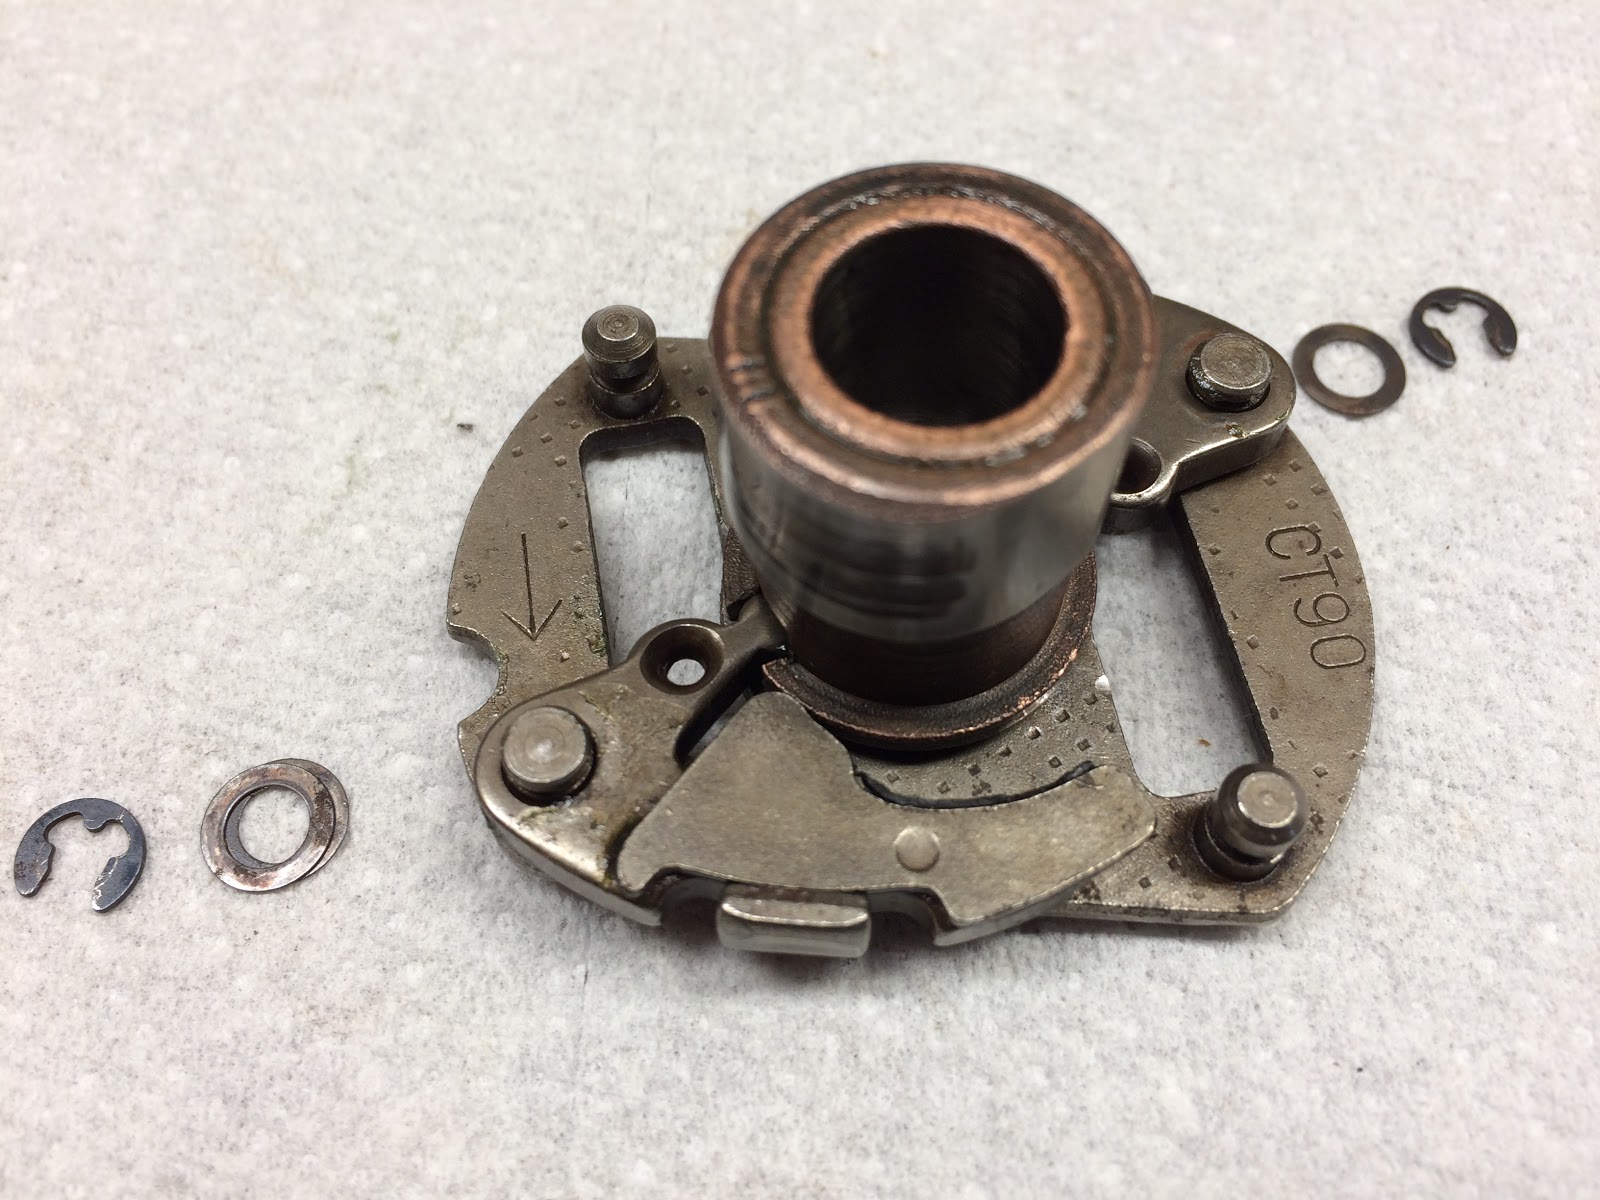
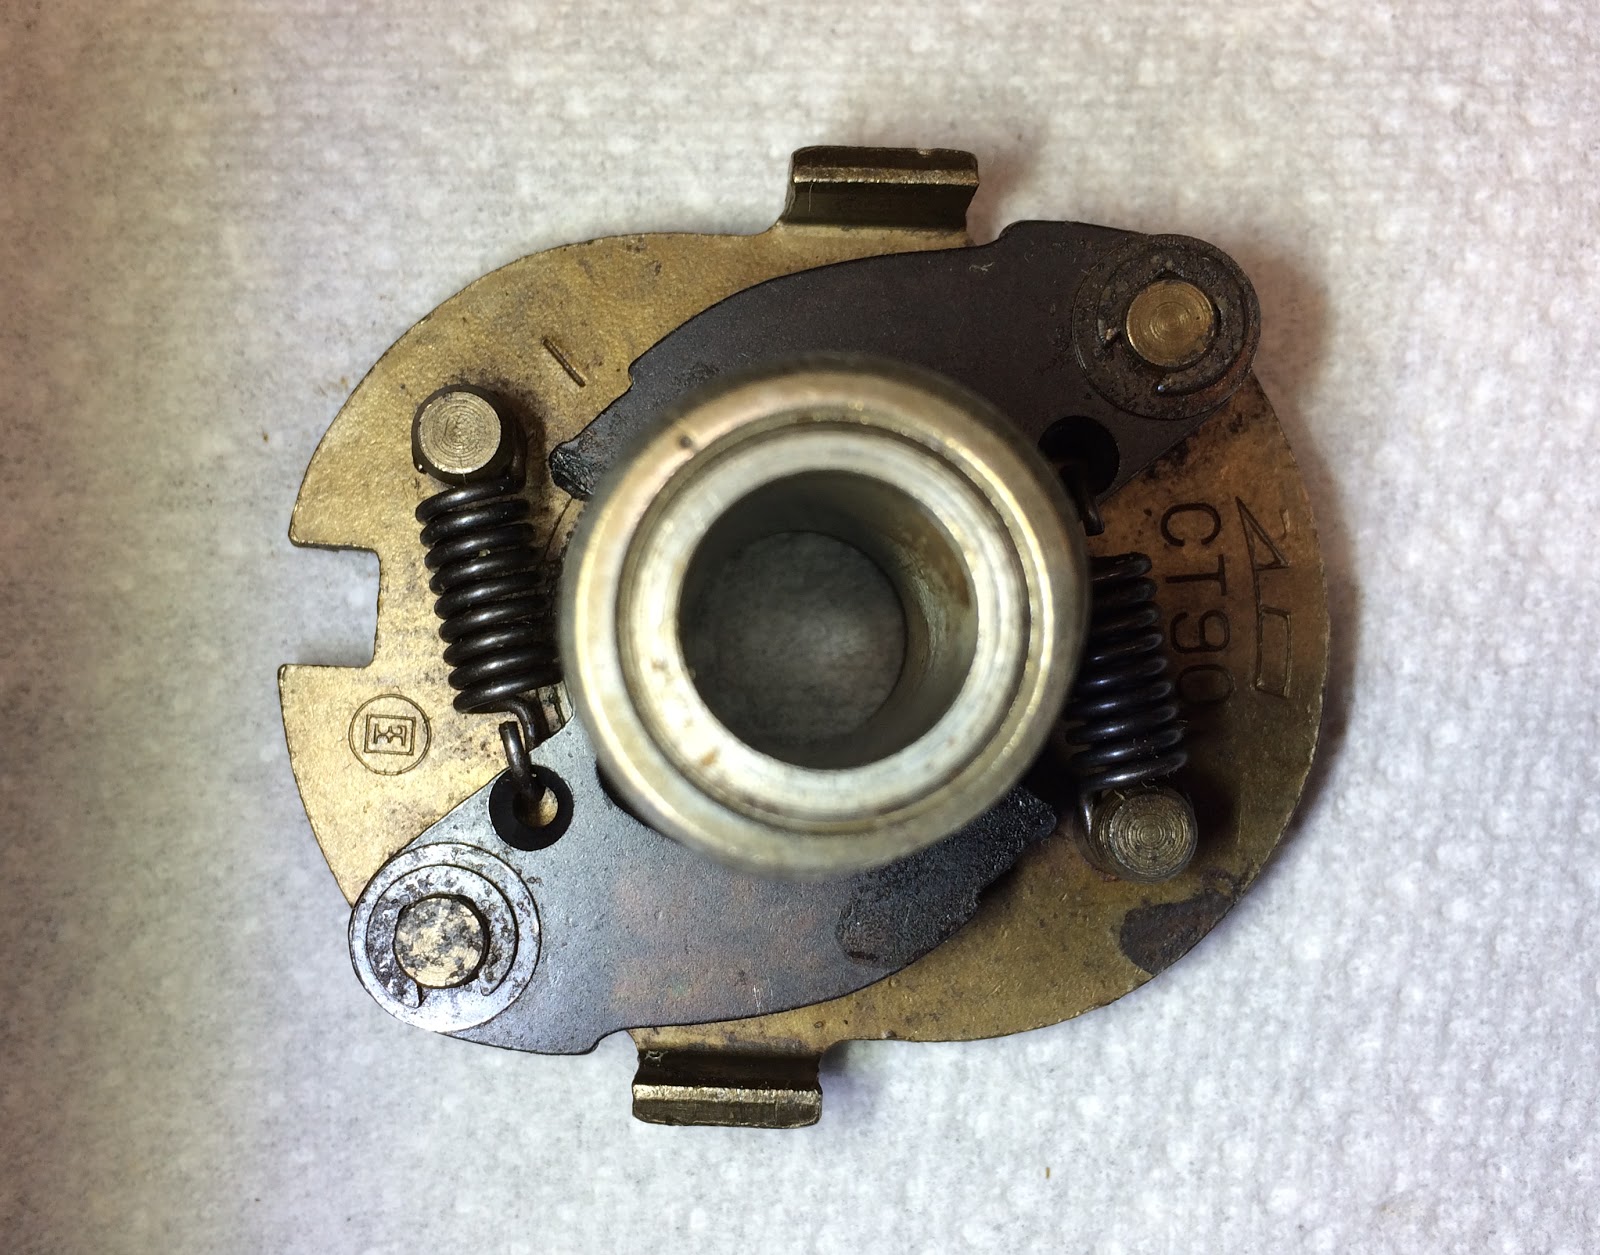
Here is a picture showing all the individual parts that make up this spark advancer.
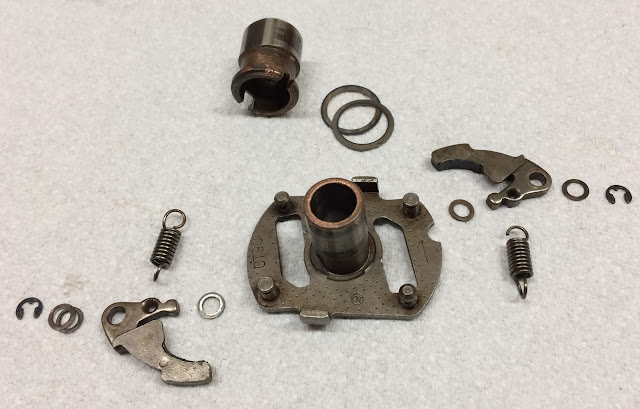
As you build up this assembly the one thing to keep in mind is that you want all the parts to be able to move and rotate freely once everything is assembled. If something is binding after you assemble the detail part you'll want to disassemble that part to figure out and fix whats causing it to bind before moving on.
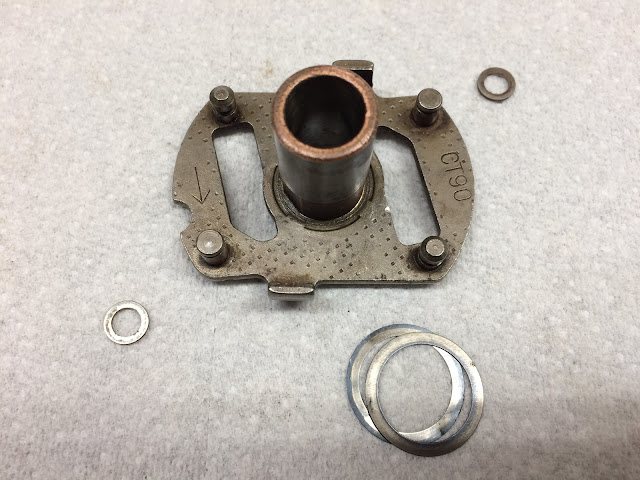
The first step in building up this assembly is to install the .030 thick washers on the two posts that will ultimately receive the advance weights, and also install the two thin washers on the center shaft that the ignition cam will rotate on.

With that complete it is worth taking a minute and talking about lubrication for the assembly as it needs to be added on most of the remaining parts that have to be assembled, but it is very important to only to use the minimum amount needed and what you do use needs to be good for the higher temperatures that the spark advancer will see in use. If you use to much lubricant it may come back to haunt you in the future as it dries out and gums up the operation of the assembly.
The Pardue Brothers have a great write up on the CT90 spark advancer along with some recommendations on lubricants to consider using.
With your lubricant selected, the next step is to very lightly lubricate the hole in the advance weights and the mating pin they will be installed on and place the advance weights on the pins. While the advance weights are in general identical, it doesn't hurt to keep track of which pin they came off of when you disassembled the unit as sometimes there can be a different number of shim washers on top of the weights and under the E clips that get installed at the end of the assembly process.
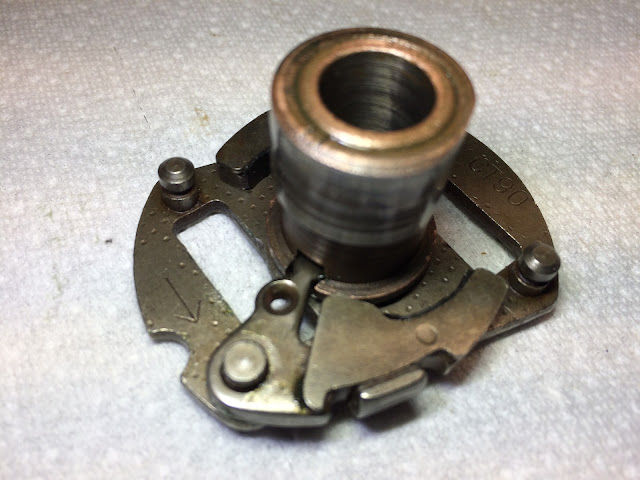
The next step will be to install the ignition cam that will rotate on the center shaft. This is an important step in the assembly process as the cam cane be installed two ways with only one of those ways being correct. If installed incorrectly you'll never get your bike to run. To help make sure you install it correctly, Honda was nice enough to include two hash marks on the top rim of the cam that you align to the base assembly. This feature isn't always the same on all spark advancers and I'll show the other configuration I've seen later in this post.
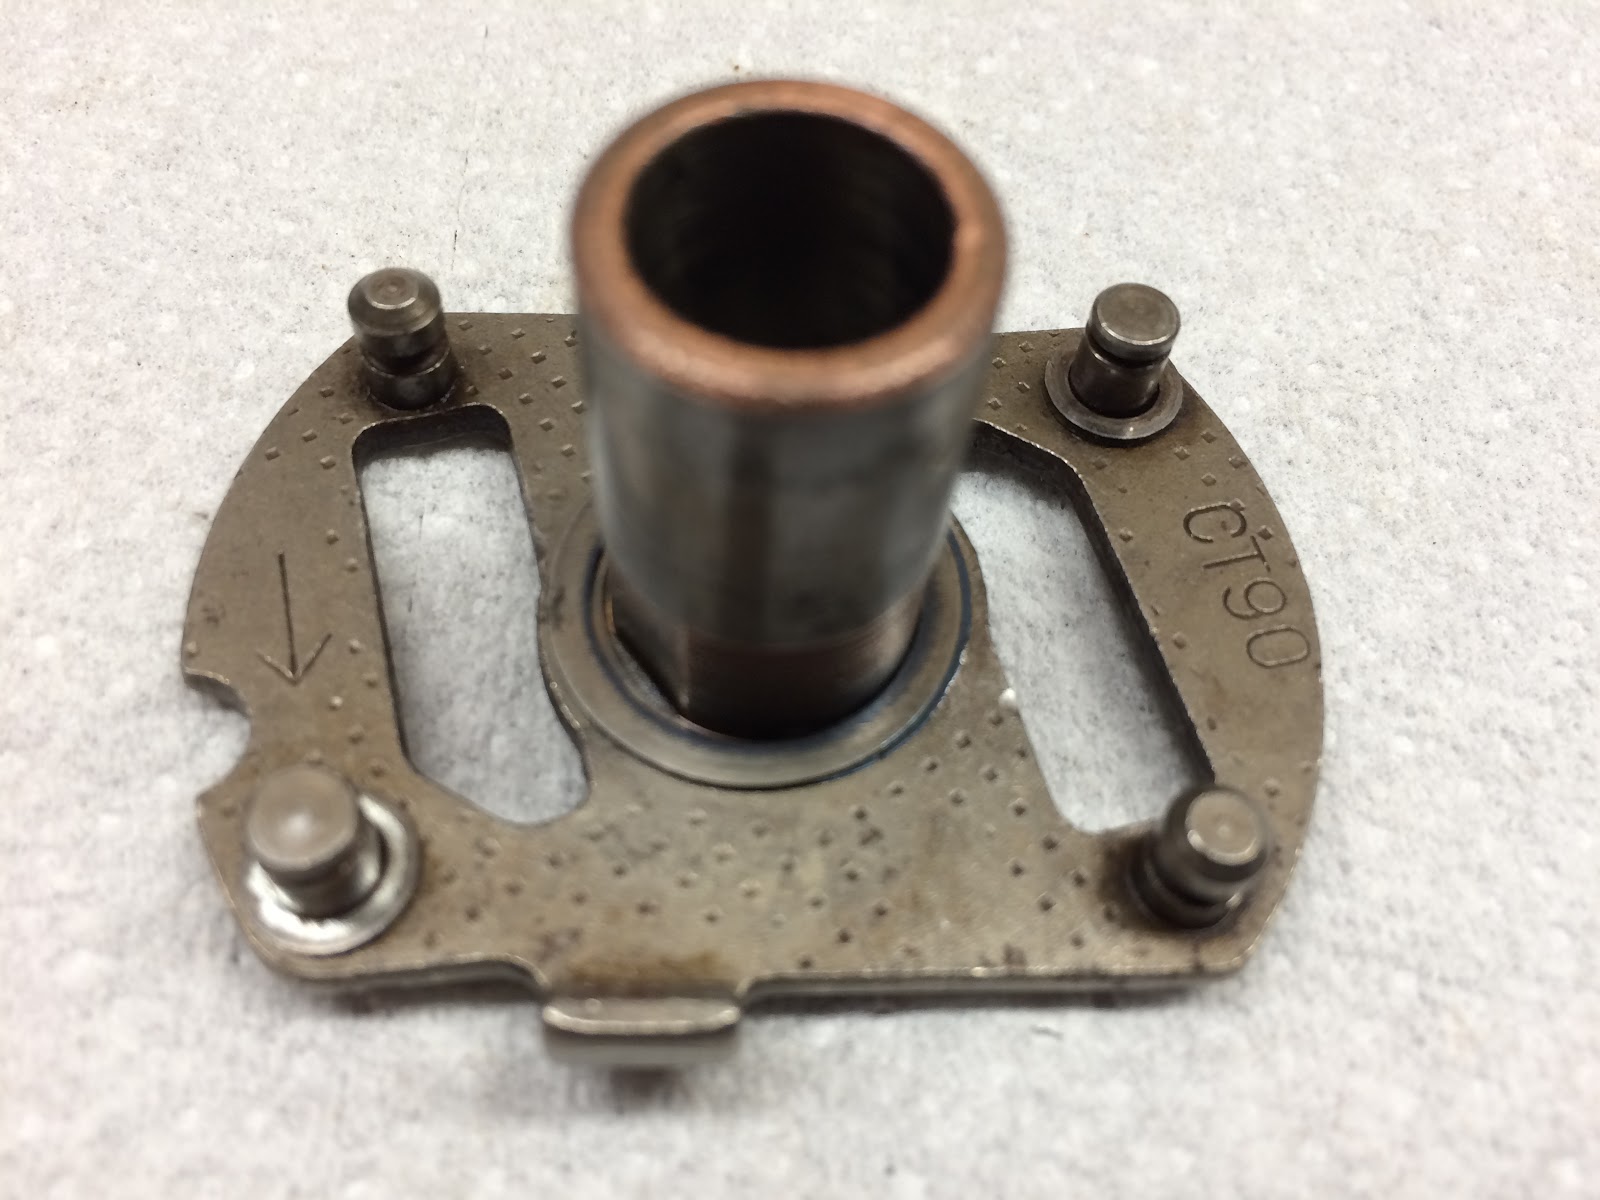
In the next picture on the left is the bottom of the base for the assembly and on the right is cam with the two alignment marks on the top rim of the cam pointing towards the slot or groove cut into the base assembly. The slot on the base is what engages the pin on the cam shaft when the advancer is installed in the head. When you install the cam on the base assembly you want to make sure the two alignment marks are pointing in the same direction as the slot in the base. The circular notch on the right edge of the base makes a good reference for you to make sure the alignment marks on the cam are pointing in the direction of this feature when the cam is installed.

First very lightly lubricate the inside diameter of the cam or outside diameter of the shaft on the base assembly and then to install the cam you simply slide it over the shaft on the base assembly making sure the alignment marks are pointing in the direction of the circular notch and then mate the two slots at the base of the cam with the legs on the advance weights.
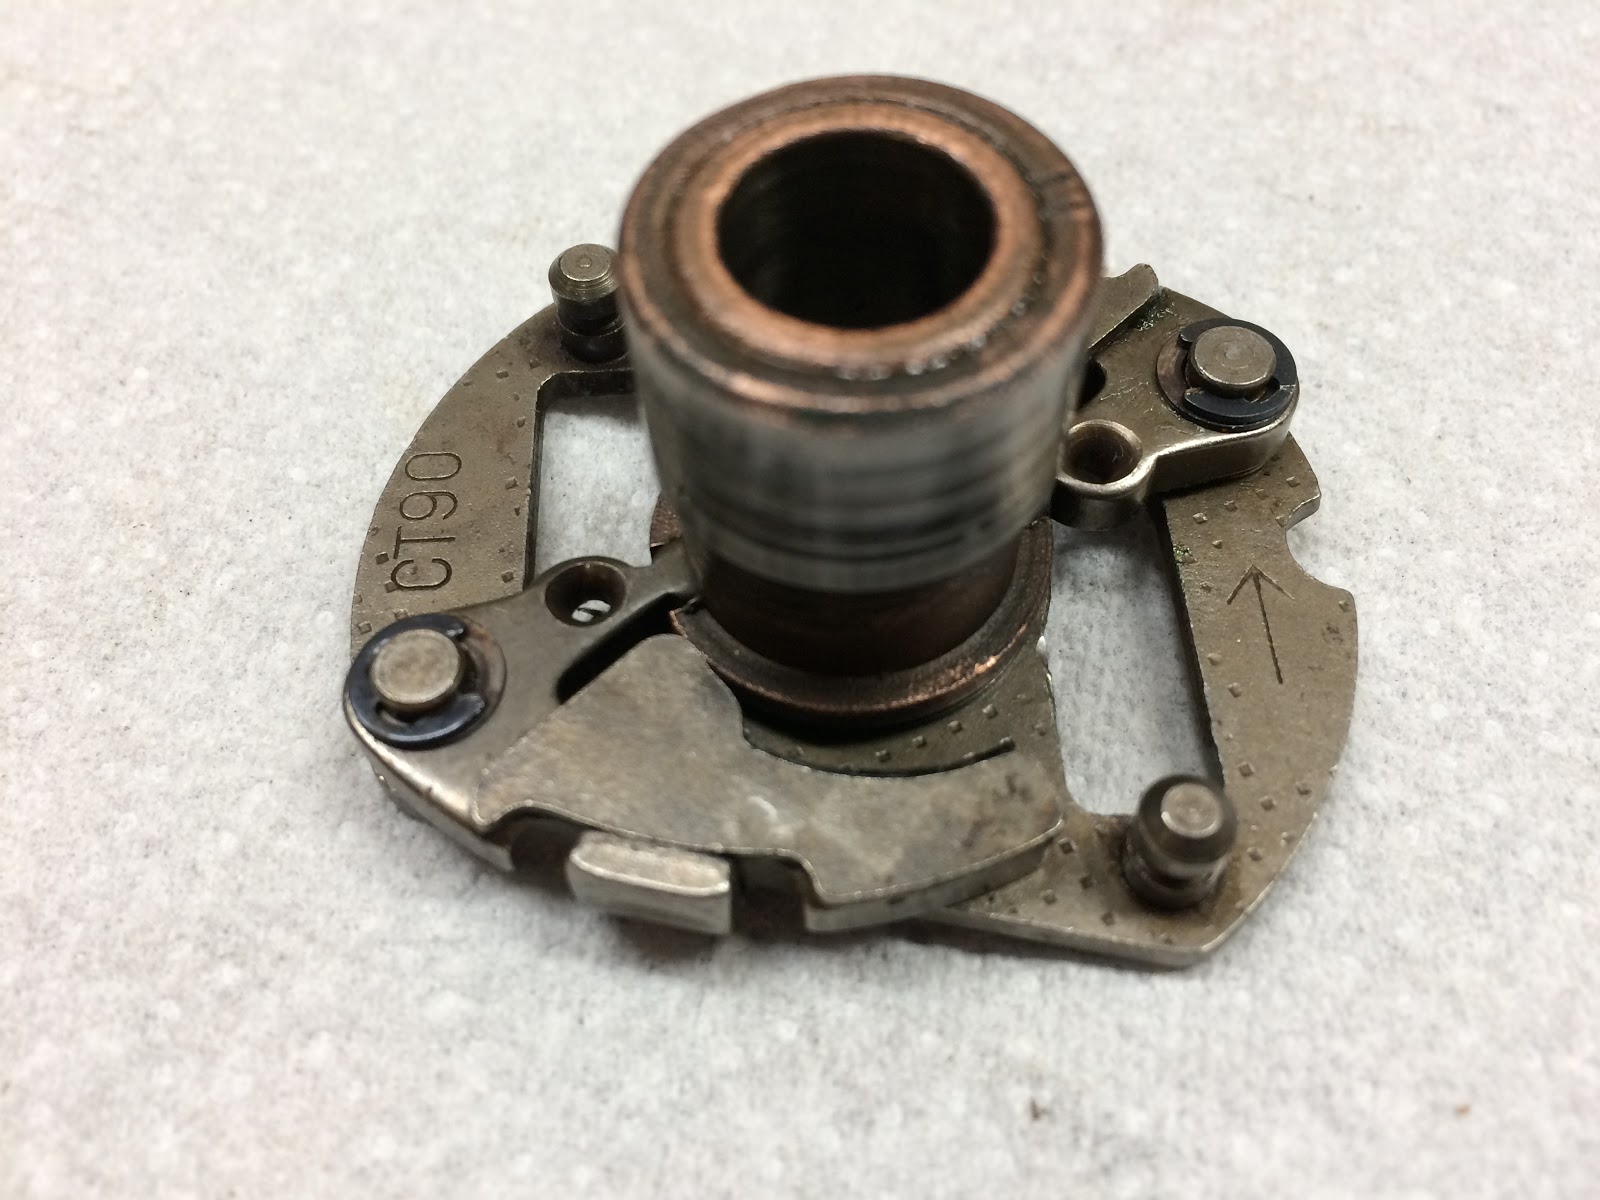
The next step is to finish off the installation of the advance weights by installing the washers and E clips on each of the respective pins. If your washers are missing or rusted, the dimensions of the washers are as follows: .0035 inches thick, the outside diameter is .293 inches and the inside diameter is .183 inches.


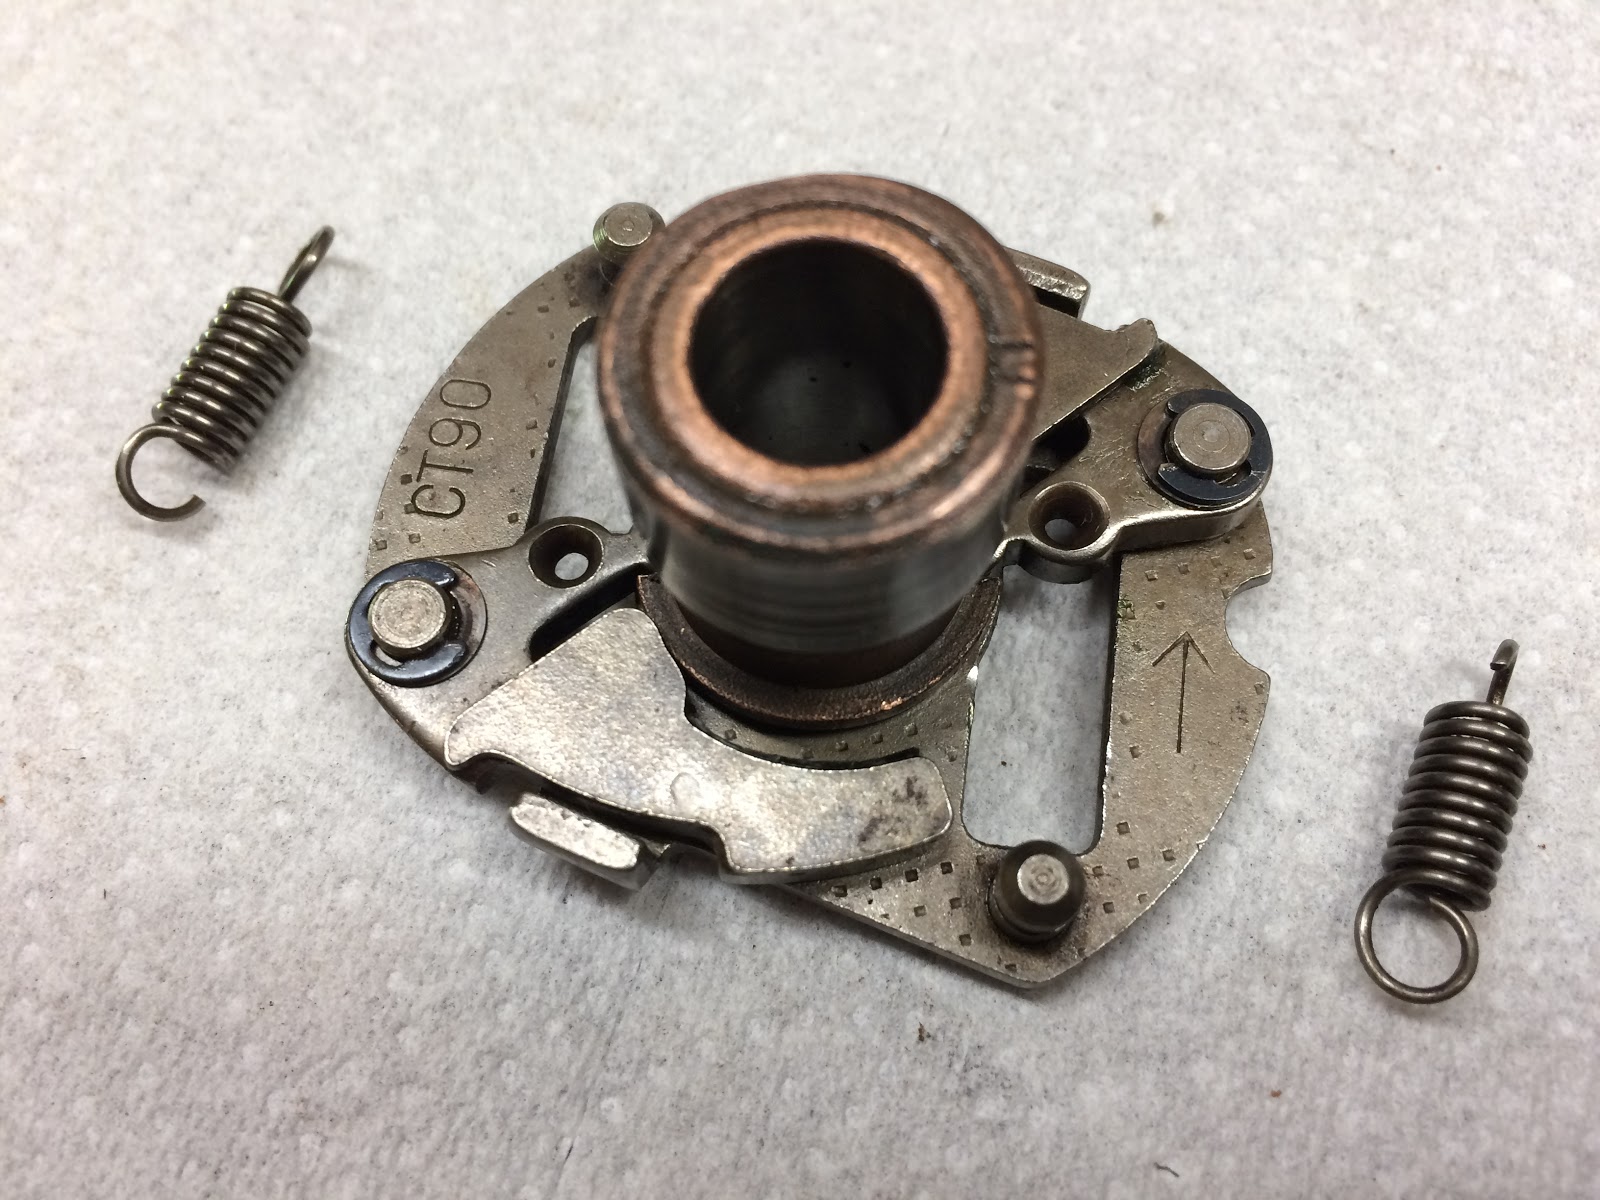
The next step is to install the springs on the advance weights.
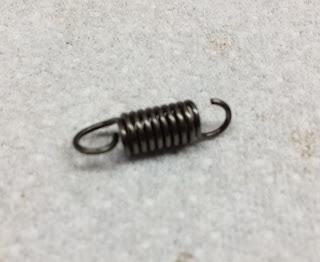
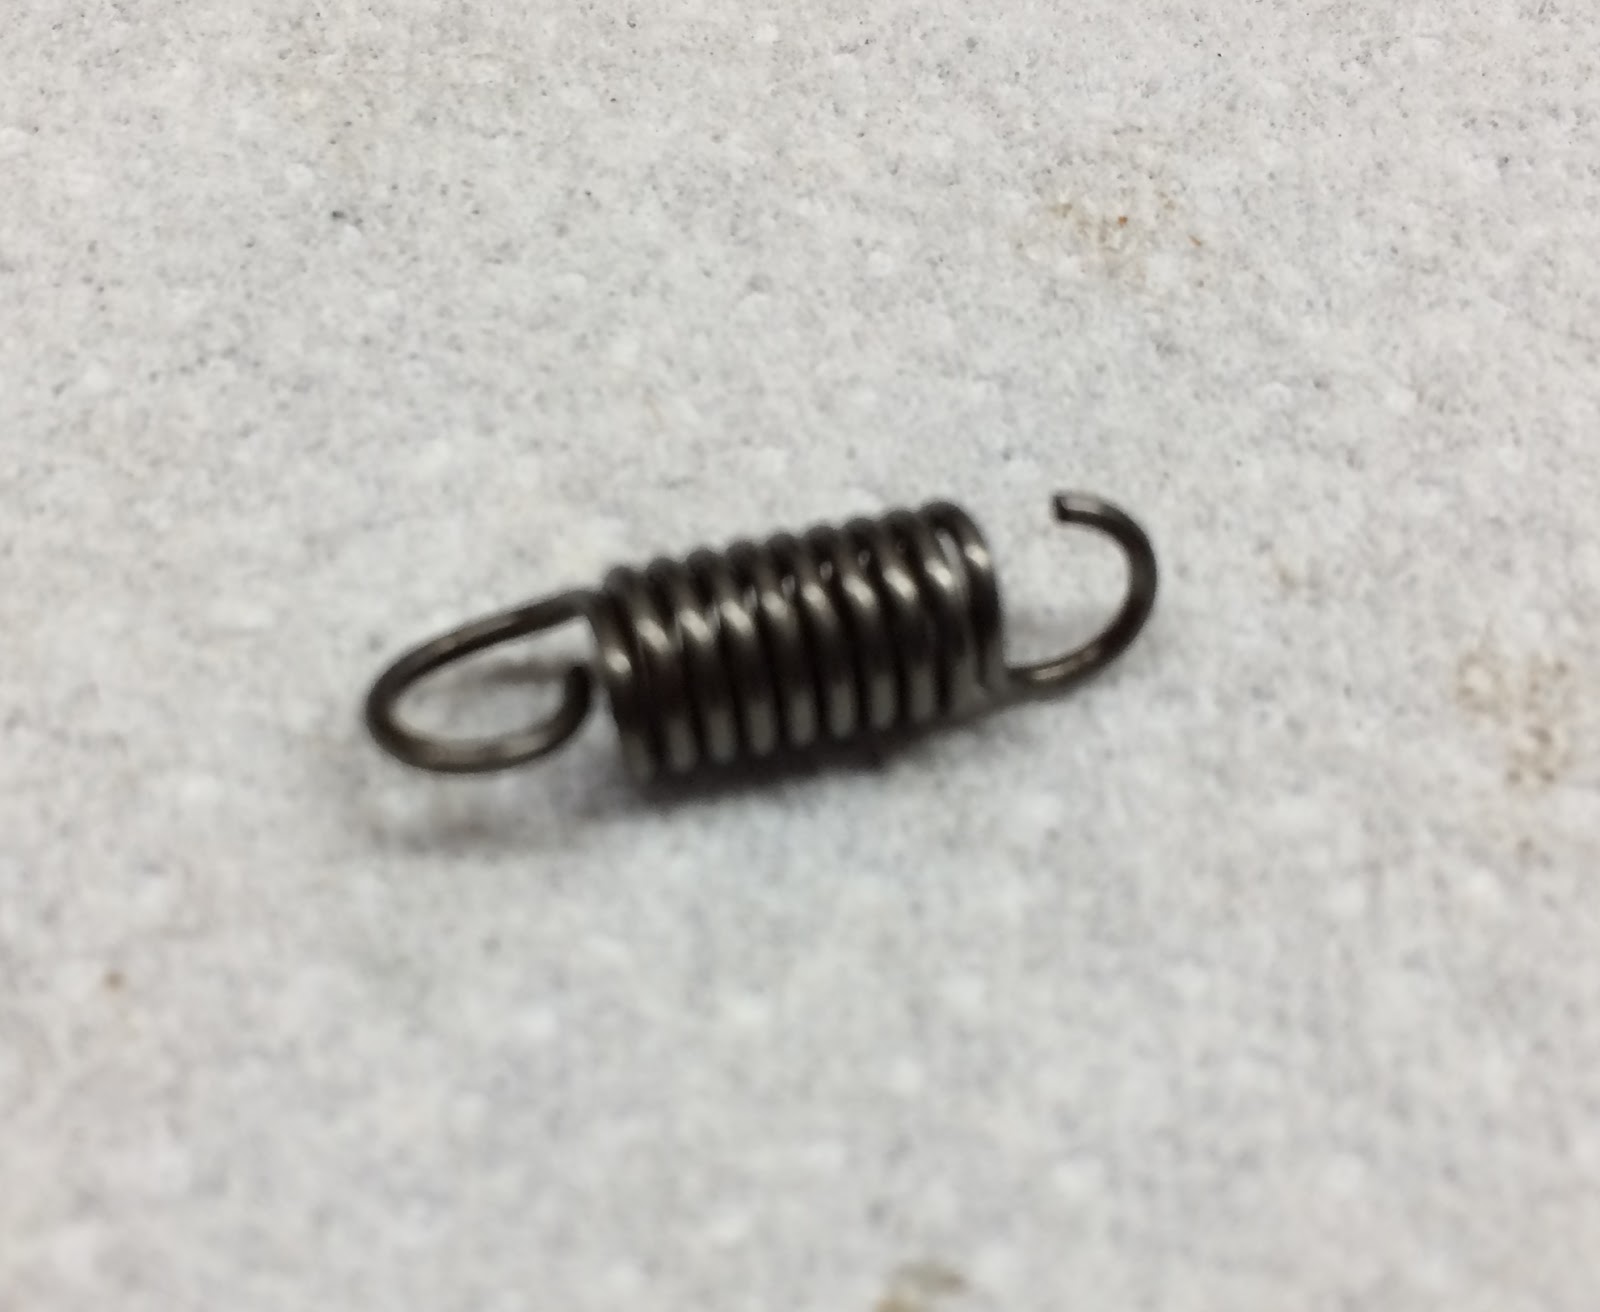
Each spring should have one end with a closed loop and the other end where the loop is not completely closed and forms a hook.
The hooked end goes through the eye of the advance weight and the closed end goes over the corresponding pin and mates into the groove at the top of each pin. You can also add a little lubricant at each of the interfaces while installing the spring.
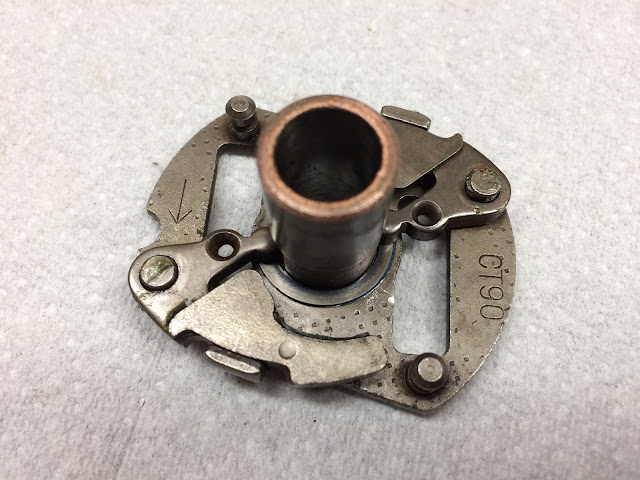
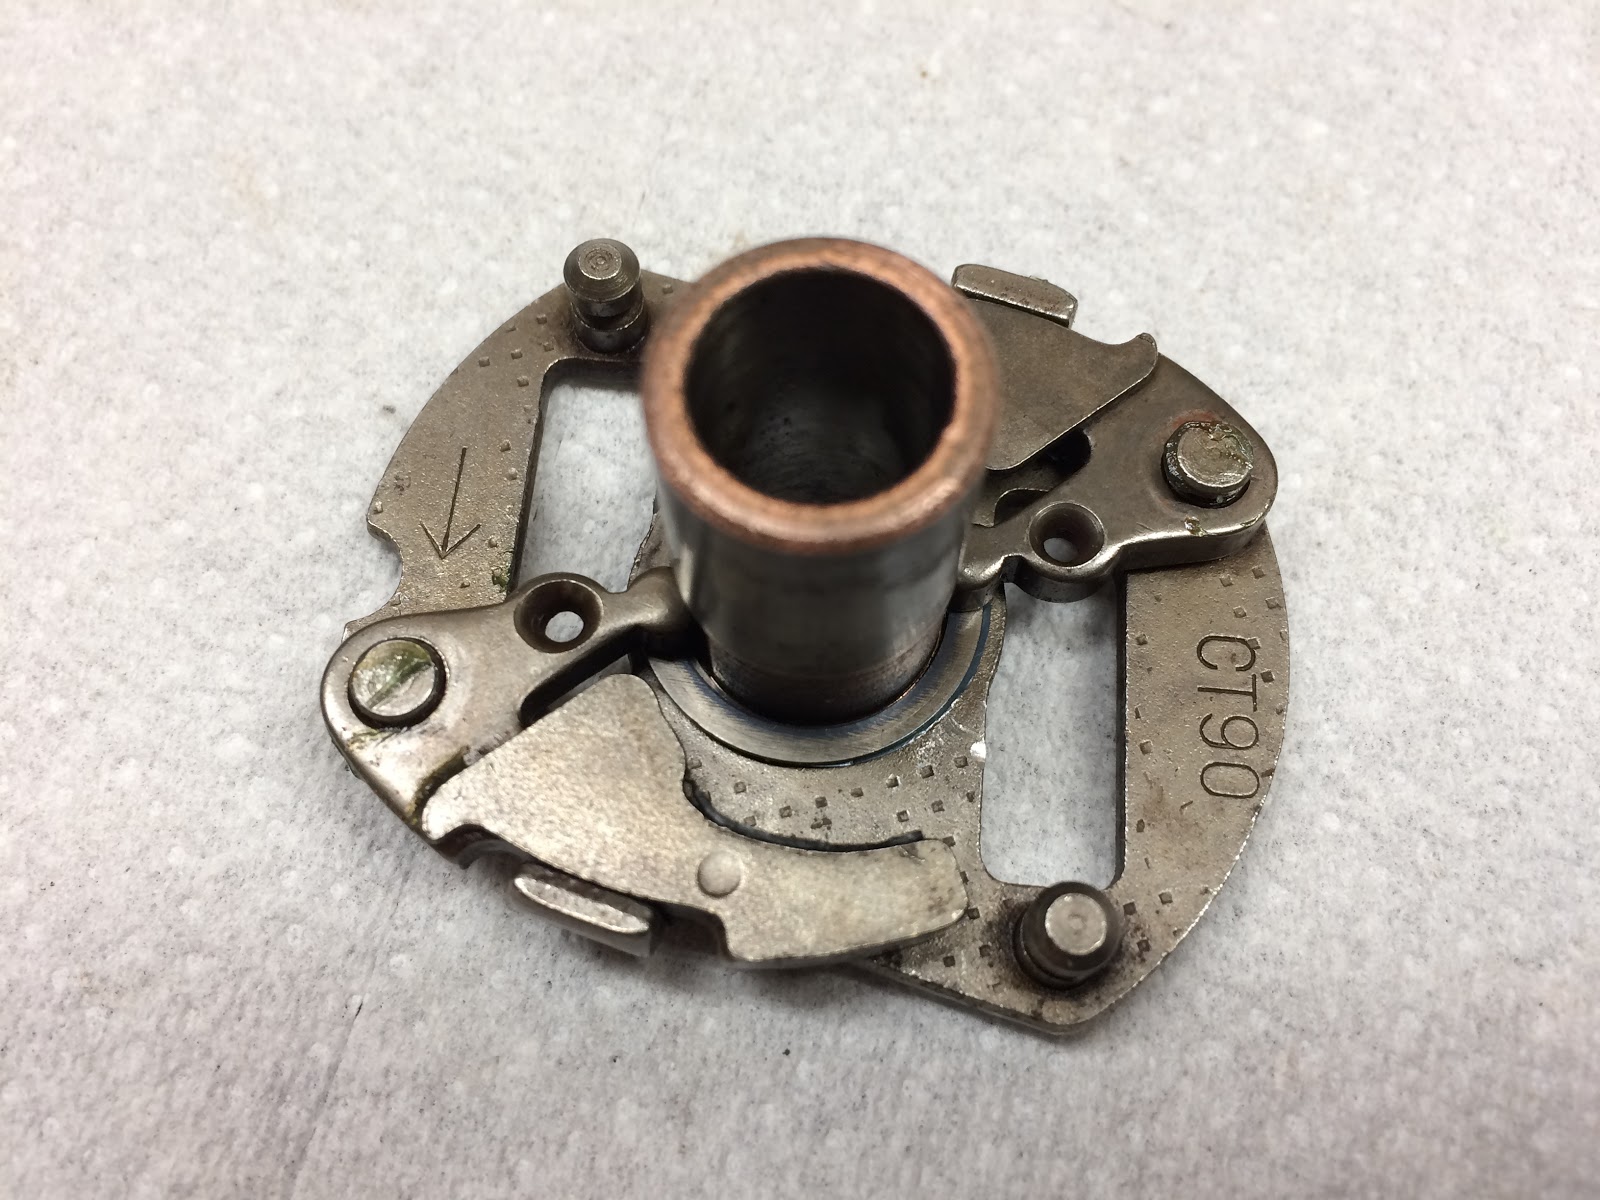
Here is the completed assembly.
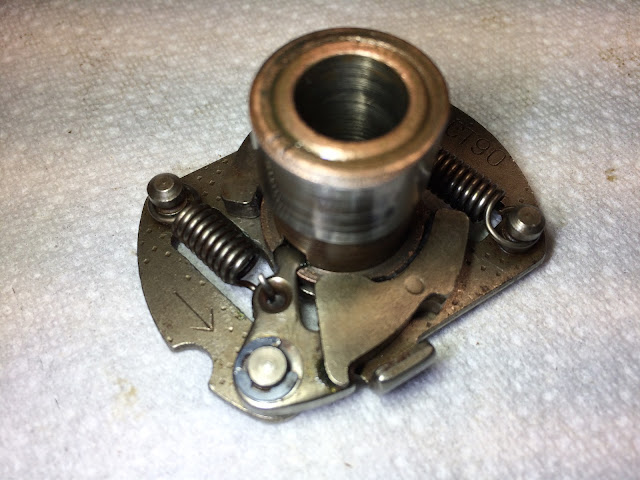
Once the assembly is all together you want to check and make sure that each of the springs are slightly extended and are causing the advance weights to be slightly preloaded against the base rim of the ignition cam. This is important because if the advance weight is slight loose and not preloaded then you will have a difficult time setting your idle as the cam will be rotating back and forth within a small range of motion due to the loose advance weight. The preload is designed such that normal advance won't start to occur until the engine rpm's are increased some amount above idle. If your advance weights are slightly loose try switching the springs between the weights or take a pair of needle nose pliers and adjust the hook or eye on the spring to shorten the overall length.
As I stated earlier their are two configurations of spark advancers that I am familiar with on the CT90 and there may be more, but here is a picture showing both of the configurations I have seen with the one on the left being the one we just assembled and the one on the right the alternate configuration.

The alternate configuration is functionally the same and is interchangeable as an assembly, but has some slight differences that are worth pointing out.
Here is an exploded view of the alternate configuration showing all of the detail parts that make up the assembly.
While this assembly will assemble in the same basic way as we went through with the first configuration, the individual detail parts are slightly different and should not be interchanged between the two assemblies except for maybe the springs which seem to be similar enough.
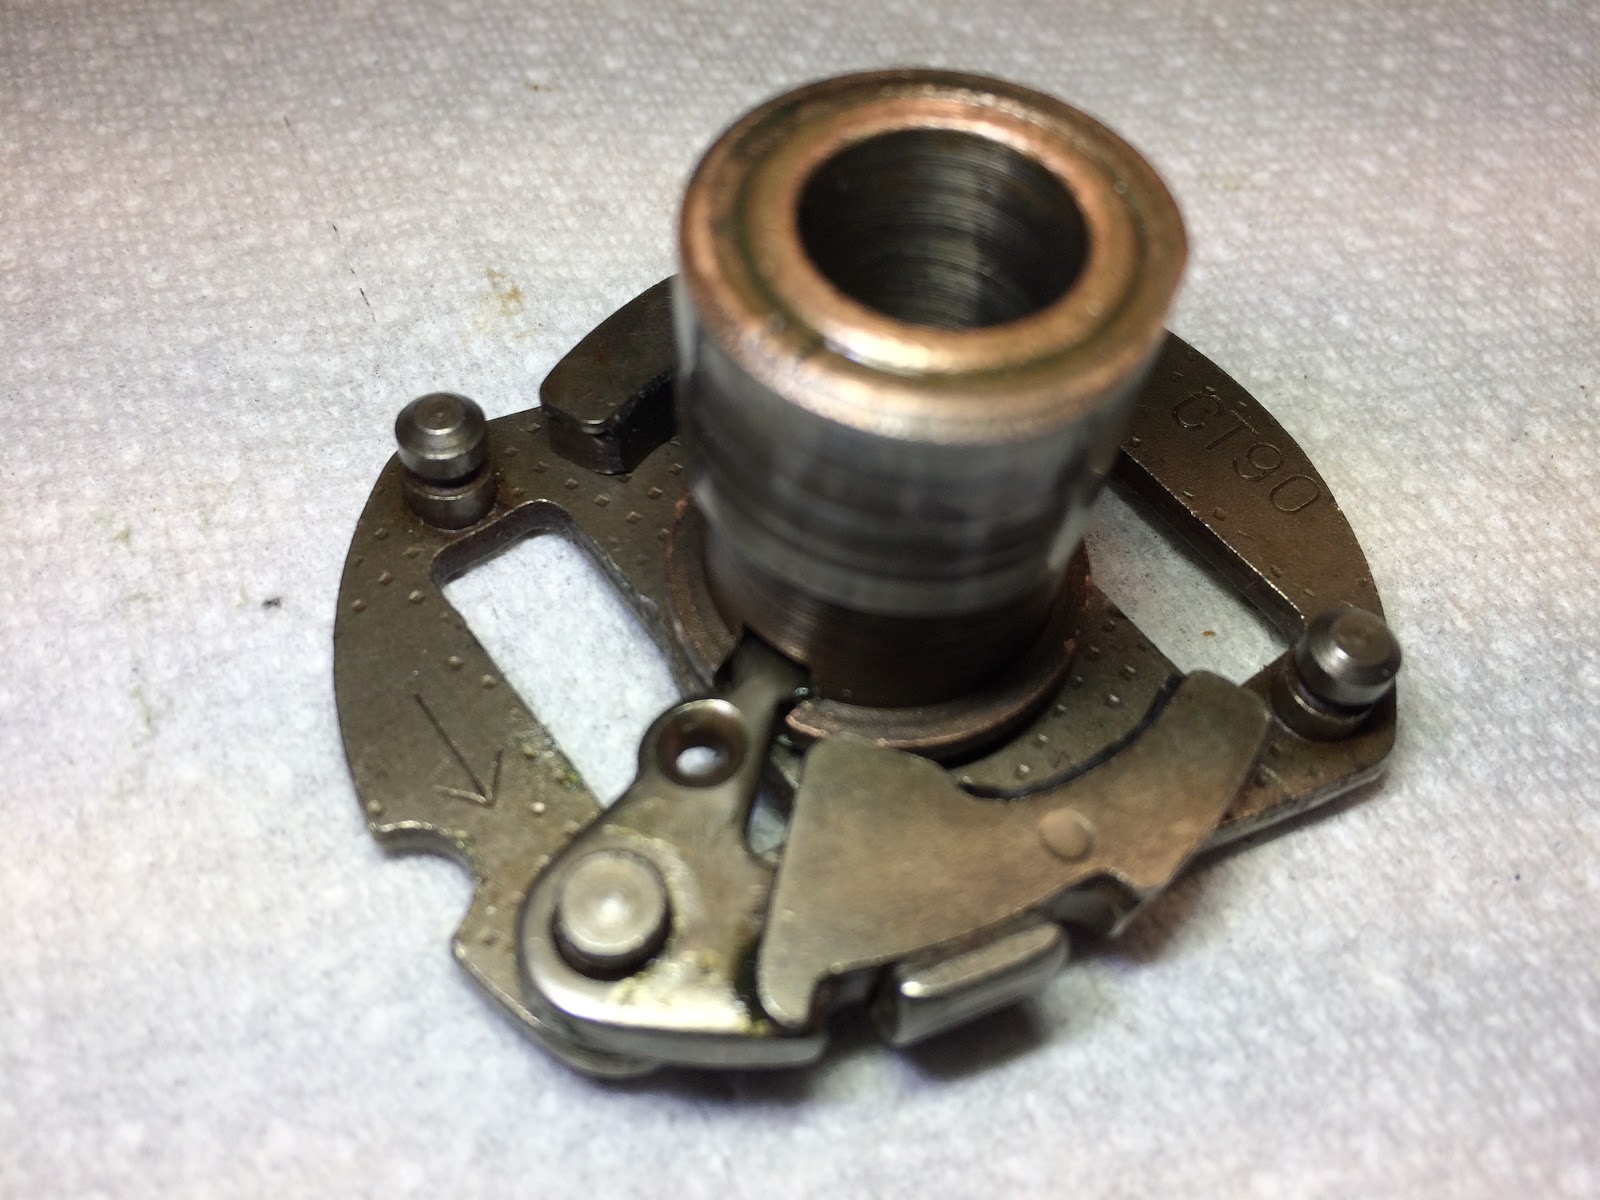
One significant difference between this assembly and the earlier configuration is the way in which the ignition cam and base plate are marked to allow you to correctly install the cam. With this configuration of spark advancer there is a single dot/punch mark on the rim of the cam that is used to align with a 1/8 inch long line stamped in the top of the base plate. Both of those features can be seen at about the 10:30 position in the photo below.

Why does the timing have to be advanced?
You may ask why do you need to even have a spark advancer in your CT90? The short answer is that the fuel air mixture that gets ignited and burned in the cylinder of your CT90 only burns at a fixed rate no matter what the rpm of the engine is. There is an ideal point in an engine stroke that occurs around 12 to 16 degrees after top dead center where it is desirable to have the maximum pressure develop from the burning fuel/air mixture because the piston and crank are at an angle that will have the greatest mechanical advantage and therefore produce the greatest power. Since the fuel/air burns at a constant rate you need to start the process earlier and earlier as the engine increases in rpm's so the max pressure always develops at the same ideal point in the stroke of the piston/crank.
The spark advancer is a simple but ingenious device that can sense the increase in engine speed through the advance weights being driven radially outwards due to the centrifugal force that develops at increasing rpms's and since the weights are physically engaged with the slots at the base of the ignition cam, they will cause it to rotate and advance the point in time where the points will cause the spark plug to fire.
Things that cam impact your timing
1. As you go to a larger bore size you may want to increase you timing slightly as you will have more fuel/air mixture to burn so you may need to start the process sooner.
2. Fuel/air mixtures that are lean or rich tend to burn slower and therefore may require a slight increase in timing. An ideal stoichiometric mixture of 14.7 parts air to 1 part fuel is always desired as it will result in the fastest burn time possible and is what most engines are designed around. If you want to understand why the ideal mixture is 14.7, here is a video link that will explain it all, but I'll warn you up front that you're in for a chemistry lesson.
3. An engine with high compression will not need to have as much advance as a engine with poor compression as a fuel/air mixture under high compression burns quicker.
4. In areas of very high humidity you may need to advance your timing slightly because the additional moisture in the fuel/air mixture may result in a slower burning mixture.
Helpful Links (Shop Manuals, Wire Diagram, Model Information, etc.)
Link to page with listing of CT90 parts available on Amazon
I was in the process of building up an engine for one of my project bikes and had to go through and clean up the spark advancer, so I thought I would share some detailed photos of the spark advancer assembly and the process for building it back up.
While I don't plan on providing any details on how to get an old spark advancer assembly apart and clean, I will offer up that solvent, penetrating oil, and a lot of patience will eventually do the trick.
Here is a shot of a clean and assembled CT90 spark advancer. There are a couple of different configurations used on the CT90 and I will show another configuration further along in this post, but the one below is typical for a CT90.

Here is a picture showing all the individual parts that make up this spark advancer.
As you build up this assembly the one thing to keep in mind is that you want all the parts to be able to move and rotate freely once everything is assembled. If something is binding after you assemble the detail part you'll want to disassemble that part to figure out and fix whats causing it to bind before moving on.
The first step in building up this assembly is to install the .030 thick washers on the two posts that will ultimately receive the advance weights, and also install the two thin washers on the center shaft that the ignition cam will rotate on.

With that complete it is worth taking a minute and talking about lubrication for the assembly as it needs to be added on most of the remaining parts that have to be assembled, but it is very important to only to use the minimum amount needed and what you do use needs to be good for the higher temperatures that the spark advancer will see in use. If you use to much lubricant it may come back to haunt you in the future as it dries out and gums up the operation of the assembly.
The Pardue Brothers have a great write up on the CT90 spark advancer along with some recommendations on lubricants to consider using.
With your lubricant selected, the next step is to very lightly lubricate the hole in the advance weights and the mating pin they will be installed on and place the advance weights on the pins. While the advance weights are in general identical, it doesn't hurt to keep track of which pin they came off of when you disassembled the unit as sometimes there can be a different number of shim washers on top of the weights and under the E clips that get installed at the end of the assembly process.
In the next picture on the left is the bottom of the base for the assembly and on the right is cam with the two alignment marks on the top rim of the cam pointing towards the slot or groove cut into the base assembly. The slot on the base is what engages the pin on the cam shaft when the advancer is installed in the head. When you install the cam on the base assembly you want to make sure the two alignment marks are pointing in the same direction as the slot in the base. The circular notch on the right edge of the base makes a good reference for you to make sure the alignment marks on the cam are pointing in the direction of this feature when the cam is installed.

First very lightly lubricate the inside diameter of the cam or outside diameter of the shaft on the base assembly and then to install the cam you simply slide it over the shaft on the base assembly making sure the alignment marks are pointing in the direction of the circular notch and then mate the two slots at the base of the cam with the legs on the advance weights.
The next step is to finish off the installation of the advance weights by installing the washers and E clips on each of the respective pins. If your washers are missing or rusted, the dimensions of the washers are as follows: .0035 inches thick, the outside diameter is .293 inches and the inside diameter is .183 inches.
The next step is to install the springs on the advance weights.
Each spring should have one end with a closed loop and the other end where the loop is not completely closed and forms a hook.
The hooked end goes through the eye of the advance weight and the closed end goes over the corresponding pin and mates into the groove at the top of each pin. You can also add a little lubricant at each of the interfaces while installing the spring.
Here is the completed assembly.

Once the assembly is all together you want to check and make sure that each of the springs are slightly extended and are causing the advance weights to be slightly preloaded against the base rim of the ignition cam. This is important because if the advance weight is slight loose and not preloaded then you will have a difficult time setting your idle as the cam will be rotating back and forth within a small range of motion due to the loose advance weight. The preload is designed such that normal advance won't start to occur until the engine rpm's are increased some amount above idle. If your advance weights are slightly loose try switching the springs between the weights or take a pair of needle nose pliers and adjust the hook or eye on the spring to shorten the overall length.
As I stated earlier their are two configurations of spark advancers that I am familiar with on the CT90 and there may be more, but here is a picture showing both of the configurations I have seen with the one on the left being the one we just assembled and the one on the right the alternate configuration.

The alternate configuration is functionally the same and is interchangeable as an assembly, but has some slight differences that are worth pointing out.
Here is an exploded view of the alternate configuration showing all of the detail parts that make up the assembly.

While this assembly will assemble in the same basic way as we went through with the first configuration, the individual detail parts are slightly different and should not be interchanged between the two assemblies except for maybe the springs which seem to be similar enough.
One significant difference between this assembly and the earlier configuration is the way in which the ignition cam and base plate are marked to allow you to correctly install the cam. With this configuration of spark advancer there is a single dot/punch mark on the rim of the cam that is used to align with a 1/8 inch long line stamped in the top of the base plate. Both of those features can be seen at about the 10:30 position in the photo below.
Why does the timing have to be advanced?
You may ask why do you need to even have a spark advancer in your CT90? The short answer is that the fuel air mixture that gets ignited and burned in the cylinder of your CT90 only burns at a fixed rate no matter what the rpm of the engine is. There is an ideal point in an engine stroke that occurs around 12 to 16 degrees after top dead center where it is desirable to have the maximum pressure develop from the burning fuel/air mixture because the piston and crank are at an angle that will have the greatest mechanical advantage and therefore produce the greatest power. Since the fuel/air burns at a constant rate you need to start the process earlier and earlier as the engine increases in rpm's so the max pressure always develops at the same ideal point in the stroke of the piston/crank.
The spark advancer is a simple but ingenious device that can sense the increase in engine speed through the advance weights being driven radially outwards due to the centrifugal force that develops at increasing rpms's and since the weights are physically engaged with the slots at the base of the ignition cam, they will cause it to rotate and advance the point in time where the points will cause the spark plug to fire.
Things that cam impact your timing
1. As you go to a larger bore size you may want to increase you timing slightly as you will have more fuel/air mixture to burn so you may need to start the process sooner.
2. Fuel/air mixtures that are lean or rich tend to burn slower and therefore may require a slight increase in timing. An ideal stoichiometric mixture of 14.7 parts air to 1 part fuel is always desired as it will result in the fastest burn time possible and is what most engines are designed around. If you want to understand why the ideal mixture is 14.7, here is a video link that will explain it all, but I'll warn you up front that you're in for a chemistry lesson.
3. An engine with high compression will not need to have as much advance as a engine with poor compression as a fuel/air mixture under high compression burns quicker.
4. In areas of very high humidity you may need to advance your timing slightly because the additional moisture in the fuel/air mixture may result in a slower burning mixture.
Helpful Links (Shop Manuals, Wire Diagram, Model Information, etc.)
Link to page with listing of CT90 parts available on Amazon
Excellent writeup and even with two ST90's, two CT90's, spare engines and extra spark advancers in a sack around here, I have never seen that other style of spark advancer. I definitely learned something there. I have seen that some of these advancers have notches on the back of the counterweight arms that are cut more deeply which allows for the arms to extend further (provides more advance) at high rpm before the arm contacts the stop.
ReplyDeleteI use a tube of old Bosch distributor lube grease for my spark advancers. This stuff is stiff enough to not melt under high heat or migrate under high RPM. The stuff in the tube appears to be very similar to the grease that goes on the felt that greases the face of the cam where the points rubbing block rides. The Bosch stuff I use in the yellow tube with black letters seems to be hard to find these days.
I have seen quite a number of these advancers with weak springs after they get hot and this weakness fails to pull the arms back in once the engine returns to idle RPM. Replacement springs are hard to find but the same springs are used on the old Honda 750 bikes of that era and Yamiya has them in stock. Quite spendy at 3000 yen (less than 27 bucks USD) here:
http://www.yamiya750.com/index.php?main_page=product_info&cPath=246_21_250_55&products_id=2168
Great writeup!! Should help a lot of people.
Rick
Hi Rick,
DeleteI appreciate your comments and also the link to a source for springs. I agree that $27.00 seems like a bit much for two small springs, but in the end if thats what will get your CT90 running smoothly then its really not all that bad.
Mike
When adjusting the static ignition timing, temporarily lock the spark advance cam in the full advanced position ( use a sparkplug washer that is the same diameter as the cam, between the cam and the washer on the spark advance fastening bolt ) and set the ignition timing to between the two full advanced marks on the stator rotor. This will compensate for weak springs on the spark advance unit. When done unlock the cam on the advancer unit to allow it to operate normally.
ReplyDeleteThe motor operates with the ignition at full advance most of the time it is being ridden not at idle. Honda even recommends that to properly set the ignition timing, you need to use a timing light and set the timing to full advance. Check your Honda Trail 90 owner's manual.