Posts

Showing posts from 2017

Product Review - CT90 Clutch Tool

Image
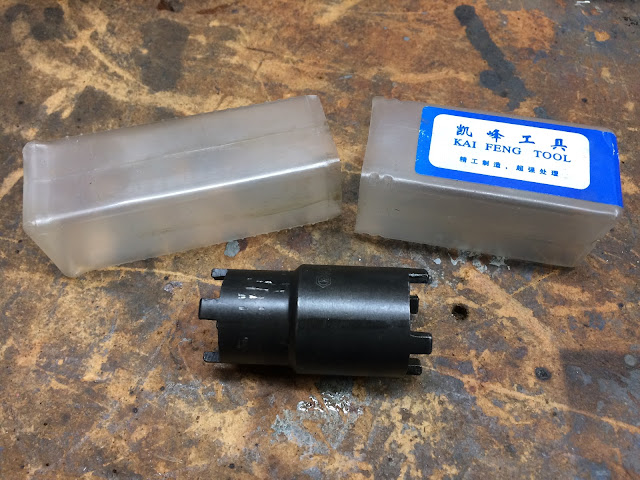
CT90 Clutch Tool I purchased this clutch tool off of eBay over a year ago and have now used it a number of times and its still going strong and I have been very happy with the purchase.  I mentioned the tool in a previous post related to working on your CT90 clutch , but thought I would share a few additional thoughts here. To rebuild the clutch pack on a CT90 you first need to remove it and that process involves the removal of a special nut that requires a spanner tool to loosen it.  While it may be possible to remove the nut using a punch or some other backwoods mechanic method that stands a high chance of screwing something up, the right way is to purchase a spanner tool given how cheap they are on eBay. I purchased this tool off of eBay for $6.55 and there are several sellers that offer this same tool for a similar price.   The tool is designed to work with two sizes of spanner nuts, 22 mm and 24 mm (what is needed for your CT90).

Product Review - Cylinder Flex-Hone

Image
I had a couple of cylinders that I pulled off of some bikes that I picked up that weren't running and was surprised that they only had light rust, so I decided to order a hone to clean the cylinders up myself without having to send them out to get a new bore. I ended up ordering a Flex-Hone cylinder hone manufactured by Brush Research from Amazon .  The Flex-Hone was 2" (51 mm) in diameter that was 240 grit, and was from the BC Series Flex Hones.  The price of the cylinder hone was $18.00 and it is made in the USA.  

Checking Your Rear Wheel Hub Rubber Dampers to See if They Are Worn

Image
Something that is often overlooked when someone picks up a used CT90 is the condition of the rubber dampers in the hob of the rear wheel.  These rubber dampers are important in that they help reduce the loads generated in the drive system when they are in good condition and can generate significant loads in the drive system if they are worn. You can do a basic check of the condition of these dampers without having to disassemble anything on your CT90 and it really only takes a few seconds to do.  I have prepared the video below to show a CT90 which have dampers in good condition and all a CT90 where the dampers are worn and need to be replaced.

The Basic Sequence and Process to Set or Adjust your Honda CT90 Timing

Image
The primary goal in setting the timing on your CT90 is to have a spark occur at the spark plug due to the points opening up when the piston is at the ideal position before top dead center with both the exhaust and intake valves closed. In the write up below I will share how I go about adjusting the timing on a CT90 and I will be doing this on an engine setting on my bench, but everything I share below is equally applicable for an engine mounted on a bike. Related Posts Cut away of a CT90 Engine - CT90 Engine Exposed! My Process to get a CT90 that won't Start to Start Adjusting and Jetting a CT90 Carb CT90 Engine Assembly Honda CT200 Engine Reassembly Building a static timing light from a free Harbor Freight LED Light To set the timing on a CT90 there are four main steps: 1. Making sure that the timing chain sprocket that drives the overhead cam is installed at the correct position on the timing chain relative to the crank/piston assembly 2. That the valves are adjuste

Alternative Spring Configuration for CT90 Brake Switch

Image
A while back I was working on one of my basket case K1 CT90's and needed a spring for the brake light switch that is actuated by the rear brake lever and brake pedal.  At the time DrATV/Beatrice was out of stock of the spring so I decided to find another spring to do the job as I was more focused on getting something that worked and less on having be a picture perfect restoration. Here is a picture from one of my other CT90's on what a stock spring looks like in this application. My goal was to find a replacement spring that had the same stiffness as the stock spring and I ended up finding a spring on Amazon that had the right stiffness and looked like I could make it work. iIt was only $2.89 for two springs, so I decided to give them a try and added the springs to my next Amazon order. Since the spring from Amazon was not the same length I had to add a section of bailing wire to get a final configuration that would fit in the same location as a stock spring.  Her

Honda CT90 Sub-Transmission Reassembly

Image
Updated 11/11/17 to correct the section on installing the high range gear where I left out the step to install the splined washer and retaining ring after the high range gear is installed. I was building an engine for a project CT90 and was reassembling the sub-transmission and thought I would capture the build of that assembly here as a post for future reference and for anyone else to utilize if they happen to be working on this portion of a CT90's engine assembly. Here is an overall picture of all of the parts that go into the sub-transmission assembly

Product Review - Huri Air Filter for the CT90

Image
I have two 1969 K1 CT90's that I am bring back to life and as I got to where they we running again, I ran into that unique problem that all the K1 owners run into and that is the rubber boot between the carb and air cleaner is unusable.  The only real alternative is to buy a new one at DrATV/Beatrice for $66.99 or try and find one on eBay at a reasonable price, which was unlikely. My goal with each of these K1's is to build a reliable runner to sell and not really restore them to their original condition, so I was flexible on what I could use for an air filter and I decided to go with a stubby style air filter. After a little searching on Amazon, I found this air filter by Huri that said it would fit on a CT90 and the price was right at $8.25 with free shipping using Prime.  In the end I am happy I purchased this air filter for my 1969 K1 CT90, but for other CT90 models I may have a different recommendation as I explain below. This is a picture of what I received after I

Honda CT90 Spark Advancer Assembly Build-Up

Image
When someone picks up their first CT90 (and they will soon find its hard to own just one...) and its a barn find that doesn't want to run, one of the things they tend to overlook in trying to get the bike running is the spark advancer.  On most older CT90's that haven't been run in a number of years, the spark advancer is usually frozen solid due to corrosion or dried grease and this prevents the bike from running well at anything other than idle. I was in the process of building up an engine for one of my project bikes and had to go through and clean up the spark advancer, so I thought I would share some detailed photos of the spark advancer assembly and the process for building it back up. While I don't plan on providing any details on how to get an old spark advancer assembly apart and clean, I will offer up that solvent, penetrating oil, and a lot of patience will eventually do the trick. Here is a shot of a clean and assembled CT90 spark advancer.  There are

Adjusting and Jetting a Honda CT90 Carburetor

Image
Recently I have had a couple of my CT90's start to give me some issues with how they were running and all the indications pointed at issues with the carb jetting and/or how it was adjusted.  All my CT90's were non running basket cases when I picked them up and I have very much enjoyed bringing them back to life.  Along the way, the process of getting these bikes back up and running involved digging through the pile of parts that I have to find something that might work, so each bike may not have the exact parts that the original model had, which may be part of my problem. Links to Related Posts: My Process to get a CT90 that won't Start to Start The Basic Sequence and Process to Set or Adjust your CT90 Timing Step by Step Instructions for the Reassembly of a basic Two Screw CT90 Carburetor Low Cost Cleaner for your CT90 Carburetor Jets and Screws CT90 Engine Assembly Honda CT200 Engine Reassembly To get to the bottom of my potential carb issues I decided to inves

Low Cost Cleaner for your CT90 Carburetor Jets and Screws

Image
If you do any work on your CT90 at some point or another I think everyone ends up rebuilding their carburetor and one of the most difficult task can be getting your jets clean, especially the idle or slow jet that has a very small orifice. In looking for an alternative to the standard carb cleaner like Berrymans B12 (which I think is about the best carb cleaner you can buy now days) I wanted to try something that hopefully would get down and clean the interior orifice of the jets which doesn't always seem to get clean with just standard carb cleaner, and even with Berrymans B12. I found this post on the web where someone used a toilet bowl cleaner called The Works.  I like The Works and have used it to help de-rust CT90 gas tanks in the past, so I thought I would give it a try. The Works is basically hydrochloric acid and Rodine (Rodine is an acid corrosion inhibitor) and this seemed like it should be effective on the varnish and the other crud that can build up in a carb.

Product Review - Small In-Line Fuel Filters

Image
Most if not all the CT90's that I have picked up have been non-running project bikes that usually have been sitting out in the weather, which in almost every case has meant that the gas tank had some amount of rust.  While I think I do a pretty good job now that I have some experience under my belt at de-rusting tank, in the end there is always a little bit tucked away in some corner that I didn't get, so I always install an in-line filter on both the reserve and primary gas lines going to the CT90's carburetor. Given there is not a lot of space between where the gas lines exit the opening in the frame and the carburetor, I went looking for a nice small in-line filter. The first filter that I tried was a nice compact filter that I picked up off of Amazon.

Product Review - Harbor Freight Cen-Tech 7 Function Digital Multimeter

Image
One of the things I am known for is being a little cheap, so I don't have any problem taking advantage of the free items that Harbor Freight lists in their weekly adds.  One of the best free items they have is a low cost digital multimeter made by an outfit called Can-Tech. Here is a l ink to the Harbor Freight website where you can purchase the multimeter for around $4.49 if you don't take advantage of when then list it in their weekly add as a free item with any purchase. The multimeter comes with a basic set of instructions and a set of leads.

One of my favorite things - Dental Tools

Image
Over the years I have found that having a few dental tools around can really come in handy working on my CT90's either for cleaning little nooks and crannies or for trying to install or remove little tiny o-rings, or really for any one of a million other cases where something else just won't do.

Product Review - Volar Heavy Duty Drive Chain for the CT90

Image
Volar Chain for Honda CT90 I recently purchased a new chain for a 1971 CT90 that I own off of eBay from a seller named d2moto. The chain is also available at Amazon at this link here. The chain was $18.99 and included free shipping. I haven't used a Volar chain before, so I thought I would give this a try. In the end I found the chain to be of good quality and from my perspective a good value for the price.

Building a basic Honda CT90 static timing light from a free Harbor Freight LED light

Image
If you ever plan on setting the timing on your CT90, one of the tools you will need is a static timing light. You can go out and buy a simple static timing lights as there are several available, but they are actually very easy to make yourself from just about any small hand held LED light that seem to be readily available everywhere. If you are going to adjust the timing on your Honda CT90 I made a post here with step by step instructions on the process you need to follow . If your in a part of the world that has Harbor Freight and you get the mailers from them on a regular basis, you'll already know that they offer a number of free items with a purchase, and one of those free items is a LED work light/flashlight that is Item # 60566 , which by the way also is a great light to modify into a static timing light for your CT90. I have a number of these lights in my shop as they are cheap/free, provide good light and also have a hook and magnet which come on handy when you'r

Product Review - CT90/Honda Tail Light Lens

Image
I recently purchased two Honda tail light lenses off of eBay from a seller named urbikeparts and the cost was $14.00 for each lens. That price also included two mounting screws and free shipping from China to my doorstep. The sellers store on eBay is Ur-Bike-Parts. Overall I am very happy with the purchase and plan on purchasing two more that I need for a couple of other builds I am doing.  It only took about two weeks from the time I ordered the lenses on eBay until they were delivered. Here is the link to the eBay page with the lens that is current as of 10/3/17. The two lenses were shipped in a plastic envelope and each lens was individually packed as shown in the picture below.

CT90 Testing Issue With Harbor Freight Compression Tester and a Correction Factor to Fix the Issue

Image
One of the most basic things you can do to check the health of your CT90 is do a compression check. The compression tester I own is one I picked up at Harbor Freight made by U.S. General.  The compression tester comes as a set that includes the basic gauge and attached hose along with three adapters that fit most typical spark plug applications, including the one that fits the CT90 spark plug hole. While I have never had any issues using this compression tester on any of my cars, when I have used it on my CT90's it always seemed to give me an abnormally low reading even on bikes where I had just redone the top end with a new piston, freshly bored cylinder, and lapped and correctly adjusted valves. I also noticed while spending some time on various on-line sites that other people were having the same issue with this compression tester, so I decided to spend a little time and try to better understand the low results being seen with the use of this compression tester, especially

Step by Step Instructions for the Reassembly of a Basic Two Screw Honda CT90 Carburetor

Image
Anyone who ever buys a CT90 will at some point in owning the bike have to disassemble, clean and reassembly a CT90 carburetor.  The focus of this post is really just on the reassembly of the carburetor.  So after you have disassembled and cleaned all of the parts of your carb and picked up a new gasket set (or reused your old gaskets) you're ready to reassemble your carb.  The terminology I use in my descriptions below is my own and may not be exactly the same as what is called out in a Honda manual, but I hope it is clear enough for you to understand which parts I am working with. Link to related Posts: Adjusting and Jetting a CT90 Carb With respect to a new gasket set, I generally wait until I have disassembled the carburetor before I make the decision to buy a new gasket set.  I have found that most of the time the condition of the old gaskets are just fine and I'll apply a little RuGLYDE to freshen up the elastomeric parts and seals and just really make sure all of t

Simple Method to Check if the Holes are Clear in your CT90 Carburetor Emulsion Tube

Image
One of the most important steps when you are rebuilding or just cleaning your CT90 carburetor is to make sure that you check that all of the small holes along the side of your emulsion tube are free and clear. One simple way that I check my emulsion tube before reassembling it back into my carburetor is to use a LED flash light. Here is a picture of a typical emulsion tube showing the very small holes that exist along the length of the tube above the o-ring.

Lessons Learned From Buying a CT90 Without a Title and Finding out it was a Stolen Bike

Image
The Story Behind How I Bought a Stolen Honda CT90 I'm always on the lookout for a good CT90 deal and I'll regularly check Craigslist to see what bikes are for sale, especially the non-running bikes that are 90% complete and are being sold dirt cheap. Recently I picked up a great CT90 without a title, but in starting the process to get a title for the bike I was notified that the bike had been reported stolen which resulted in a series of events that I 'll share below, but based on what I went through I thought it might be a benefit to others to write this post and share a few lessons learned. Related Post: Registering a Small Motorcycle in the State of Vermont In mid August of this year I came across a great CT90 deal on Craigslist and was the first to respond to the ad and therefore was lucky enough (or at least I thought so at the time...) to pick up the 1970 CT90 in the picture below for only $200.00.

Shift Drum Stopper Replacement When Doing a Clutch Rebuild

Image
I recently learned about a CT90 failure mode that was new to me of a part called the Shift Drum Stopper that is part of your shift mechanism in your CT90.  I'm also finding that this isn't a failure mode that is all that uncommon and from now on I'm am considering replacing the shift drum stopper whenever I rebuild a clutch on one of my CT90's.  While this approach may be overkill, the part is cheap and its an easy replacement when your in doing your clutch, so I think it is well worthwhile. I recently rebuilt my clutch on my 1975 CT90 and after I put everything back together I took the bike out for a spin in the neighborhood and the bike wouldn't shift correctly, so I pulled the cover off and started poking around.  Nothing jumped out at me as being out of place, so I started surfing the web and came across several postings related to poor shifting and something called the "Shift Drum Stopper".  I went back and looked at my bike and low and behold the

Preferred Honda Shop Manual - 77 -79 CT90 and 80 - 82 CT110

Image
Even though all the CT90's I own are models built before 1977, I still like to use the Honda shop manual for the 1977 thru 1979 CT90's and the 1980 thru 1982 CT110's. This version of the Honda shop manual has much better diagrams and instructions for items common to all years of CT90's and also has a great trouble shooting diagram to help figure out what is wrong with you bike. You can download a copy of this manual at the following  page .  The follow is an example of the trouble shooting chart in the manual:

Making a Basic Vinyl CT90 Seat Cover

Image
I am always looking for a way to save a few bucks and I get a lot of enjoyment out of doing things myself, so I have a few CT90's that need seats and in a previous post I showed an approach to make your own seat foam/cushion , so I decided to go on and make covers for the CT90 seats I previously made a cushions for. While I have used a sewing machine a time or two in the past, this will be my first time trying to make a seat cover, so I look at this as a learning experience (i.e. I don't plan on my first seat cover being perfect...). Here is a picture of one of the seats I will be making a cover for.

Two Quick Tips When Installing the Bearings in your Frame Headset

Image
I was working on one of my CT90's this week and I had pulled the front forks to do some work that was needed and when reassembling the forks to the frame I thought I would share a couple of tips that I have found that help make the job go that much easier. The first thing is to use a magnetic tool tray to hold the loose ball bearings.

Helpful CT90 & CT200 Cable Info

CT90 and CT200 Cable Information I have a number of CT bikes and I always am looking for new project bikes that in almost all cases need new cables, so I put together the table below so I have a quick reference to all the latest and past cable part numbers.  I also made hot links for the cable part numbers that I know are available at Dr ATV or Everett Powersports where I buy a lot of my CT90 parts. I hope this is helpful to others and if you have any comments or see any errors please feel free to let me know. Year Model Serial Number Throttle Cable Front Brake Cable, Right Lever Rear Brake Cable, Left Lever Speedo Cable 1964 - 1966 CT200 CT200-100001 17910-107-671, 2FM-MC-3928 45450-GB4-600, 45450-033-000, 45450-053-000 43460-033-000 44830-159-000, 44830-061-810 1966 - 1967 CT90K0 CT90-100001 17910-053-000 45450-GB4-600 , 45450-033-000, 45450-053-000