Posts

Showing posts with the label Toppost

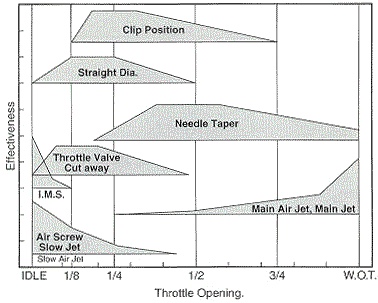
Registering a Small Motorcycle in the State of Vermont

Image
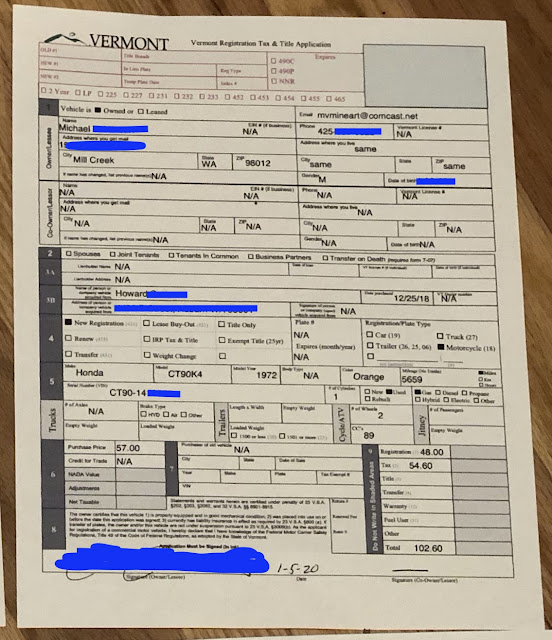
Registering a Honda CT90 in Vermont This post shares in detail my experience in going through the process to register a Honda CT90 in the state of Vermont and then take that registration and use it to get a title here in the state of Washington.  I'll explain the process and then share actual copies of the my completed application and what I received back from the Vermont DMV. I have purchased a number of CT90's that didn't have a title and with the ones that I planned on keeping, I have gone through the "Ownership in Doubt" process here in Washington State that enables you to register and license the bike so you can take it on the road, but there is a long delay in being able to obtain a title.  While the process works, it isn't cheap, and you have to go through a three year waiting period before being able to apply for an official title.  The three years is supposedly to allow time for a previous owner to come out of the woodwork and claim the bike. I

CT90 Engine Exposed!

Image
I was finally able to get around to doing a project that I have been wanting to do for some time and that was to take a bunch of extra CT90 engine components and build an engine using cases that I had machined to end up with an engine that would enable you to see all of the internal components. Related Posts: CT90 Engine Reassembly CT200 Engine Reassembly Here is a picture of how the final engine turned out.

Honda CT200 Step by Step Engine Reassembly Guide

Image
I recently picked up a CT200 that wasn't running, but seemed to be in decent shape where the engine would turn over and had signs of good compression.  I had rebuilt one CT200 a couple of years ago and sold the bike and since that time I started this blog and because I have had such a good response with the post I did on reassembling a CT90 engine, I decided to take the time to go through the engine of my new CT200 and document the reassembly in this post.  Another reason I am going through this engine is that this may end up being a bike I will keep for a while and it seems like all old CT's that I pick up have slime in the engine and the clutch will end up slipping sooner or later, so now is as good a time as any to tear it apart, clean, and then reassemble the engine to avoid any problems in the future.  I plan on taking the same approach I did with the CT90 engine reassembly post where I document in detail the step by step process on how everything goes back together in ca

Troubleshooting a Honda CT90 that won't start to start

Image
Most everyone who adopts an old Honda CT90 at some point gets to where the bike won’t start and your first instinct is to start making random adjustments, but no matter how many times you adjust or clean everything the bike just won’t start. After doing this a number of times myself I now try and take a more methodical approach where I follow the sequence of steps I have outlined below, and I’m usually successful at getting the bike running again. Others may take a different approach, but I thought I would share the items I look at and the order I look at them in case this information is useful to someone else dealing with trying to get a CT90 to start. Step 1 – Do you have good compression? Fundamental to getting a bike running is having a reasonable amount of compression, and the more you have the better. If you have a compression gauge put it on and see what you have, but if you have greater then 80 psi that should be adequate to start the bike. If you don’t have a compressi

How to Test Your CT90 Condenser

Image
One item often overlooked on a CT90 when trouble shooting is the condenser that is mounted with the ignition coil.  The primary function of the condenser is to prevent arcing at the ignition points when the points open which results in a spark being generated at the spark plug.  The condenser also to a lessor degree, helps maintain the spark at the spark plug. Links to Related Posts CT90 Rectifier Upgrade Basic CT90 Ignition Coil Check How to Test Your CT90 Rectifier Unlike CT90 ignition coils which can be 50 years old and still be in great shape, a condenser is really just a capacitor and capacitors can and will degrade with time, so its always worthwhile to take the time to test the condenser, especially if you have gone to the trouble to remove the coil/condenser assembly from your CT90. There are a couple of different ways you can check your condenser to determine if it is performing correctly. The first approach is to make a couple of subjective observations on your CT

Honda CT90 Engine Reassembly

Image
I have one 1971 CT90 where I was going to rebuild the clutch because the kickstarter just wasn't turning over the engine like it used too,  and I also had a Big Bore kit from DrATV that I wanted to install. My intent was to just do the top end and rebuild the clutch with new disks, but when I opened up the cases to rebuild the clutch pack I found a slick black slime in the bottom of the case.  I didn't like the idea that there could be black slime in the rest of the engine, so I decided to disassemble the entire engine to make sure I cleaned everything out.  Since I was tearing everything apart I thought I would document step by step how everything goes back together in this post in case others were interested in knowing what the inner workings of a CT90 engine look like. Links to Related Posts: My Honda CT90 Clutch and Headset Nut Tool Cut Away of a CT90 Engine - CT90 Engine Exposed! Repairing Damaged CT90 Spark Plug Threads Using a Time-Sert Thread Insert CT90 Clutch P

CT90 Clutch Pack Assembly Detail Build-up

Image
All CT90's at some point in their life will have the clutch start to slip and require the clutch assembly to be rebuilt. Links to Related Posts: CT90 Engine Reassembly Making a Low Cost Clutch Holding Tool for Your CT90 Shift Drum Stopper Replacement When Doing a Clutch Rebuild I have one CT90 where I could tell the clutch was starting to slip because the kickstarter just wasn't turning over the engine like it used too, so I decided to rebuild the clutch.  I don't normally tear the whole clutch pack apart when I install new clutch disks, but when I opened up the cases on this bike I found a slick black slime everywhere, so I decided to disassemble the entire clutch assembly (and actually the rest of the engine...) to make sure I cleaned everything out.  Since I was tearing everything apart I thought I would document how everything goes back together in this post in case others were interested in knowing what the inner parts of the clutch pack look like. I have als

A Way to Soften Up Old Rubber CT90 Motorcycle Parts That Works Well

Image
One of the most frustrating things I have found when working on old CT90's is dealing with the rock and rubber boots at each end of the air cleaner.  When these rubber parts a old, hard, and stiff it can make it a real pain to get in or remove the air cleaner and get access to the carb.  When I first started working on CT90's I found the use of a hair dryer to heat up these rubber parts which made them soften up, but it was only temporary and once they cooled down they became rock hard once again. I didn't want to buy all new rubber parts for my CT90's as I have too many bikes and I get more enjoyment out of doing things myself and learning about different techniques, so I went on a quest to see if there was a good method to permanently soften old rubber motorcycle parts and I came across the following four YouTube video's: Video 1 (I really enjoy all of Ichiban's videos), Video 2 , Video 3 , and Video 4 . After looking at the above videos and actually a

The Basic Sequence and Process to Set or Adjust your Honda CT90 Timing

Image
The primary goal in setting the timing on your CT90 is to have a spark occur at the spark plug due to the points opening up when the piston is at the ideal position before top dead center with both the exhaust and intake valves closed. In the write up below I will share how I go about adjusting the timing on a CT90 and I will be doing this on an engine setting on my bench, but everything I share below is equally applicable for an engine mounted on a bike. Related Posts Cut away of a CT90 Engine - CT90 Engine Exposed! My Process to get a CT90 that won't Start to Start Adjusting and Jetting a CT90 Carb CT90 Engine Assembly Honda CT200 Engine Reassembly Building a static timing light from a free Harbor Freight LED Light To set the timing on a CT90 there are four main steps: 1. Making sure that the timing chain sprocket that drives the overhead cam is installed at the correct position on the timing chain relative to the crank/piston assembly 2. That the valves are adjuste

Adjusting and Jetting a Honda CT90 Carburetor

Image
Recently I have had a couple of my CT90's start to give me some issues with how they were running and all the indications pointed at issues with the carb jetting and/or how it was adjusted.  All my CT90's were non running basket cases when I picked them up and I have very much enjoyed bringing them back to life.  Along the way, the process of getting these bikes back up and running involved digging through the pile of parts that I have to find something that might work, so each bike may not have the exact parts that the original model had, which may be part of my problem. Links to Related Posts: My Process to get a CT90 that won't Start to Start The Basic Sequence and Process to Set or Adjust your CT90 Timing Step by Step Instructions for the Reassembly of a basic Two Screw CT90 Carburetor Low Cost Cleaner for your CT90 Carburetor Jets and Screws CT90 Engine Assembly Honda CT200 Engine Reassembly To get to the bottom of my potential carb issues I decided to inves

Building a basic Honda CT90 static timing light from a free Harbor Freight LED light

Image
If you ever plan on setting the timing on your CT90, one of the tools you will need is a static timing light. You can go out and buy a simple static timing lights as there are several available, but they are actually very easy to make yourself from just about any small hand held LED light that seem to be readily available everywhere. If you are going to adjust the timing on your Honda CT90 I made a post here with step by step instructions on the process you need to follow . If your in a part of the world that has Harbor Freight and you get the mailers from them on a regular basis, you'll already know that they offer a number of free items with a purchase, and one of those free items is a LED work light/flashlight that is Item # 60566 , which by the way also is a great light to modify into a static timing light for your CT90. I have a number of these lights in my shop as they are cheap/free, provide good light and also have a hook and magnet which come on handy when you'r

Step by Step Instructions for the Reassembly of a Basic Two Screw Honda CT90 Carburetor

Image
Anyone who ever buys a CT90 will at some point in owning the bike have to disassemble, clean and reassembly a CT90 carburetor.  The focus of this post is really just on the reassembly of the carburetor.  So after you have disassembled and cleaned all of the parts of your carb and picked up a new gasket set (or reused your old gaskets) you're ready to reassemble your carb.  The terminology I use in my descriptions below is my own and may not be exactly the same as what is called out in a Honda manual, but I hope it is clear enough for you to understand which parts I am working with. Link to related Posts: Adjusting and Jetting a CT90 Carb With respect to a new gasket set, I generally wait until I have disassembled the carburetor before I make the decision to buy a new gasket set.  I have found that most of the time the condition of the old gaskets are just fine and I'll apply a little RuGLYDE to freshen up the elastomeric parts and seals and just really make sure all of t

Trials and Tribulations with Rebuilding CT90 Speedo's

Image
I currently own a number of CT90's and a few of the bikes have a loose indicator light lens in the speedometer assembly that I need to fix.  I have never opened up a CT90 speedo, but I have speedo's off of three 1969 CT90 project bikes I picked up a few months ago that all have loose indicator light lenses that needed to be fixed, so I figured their as good as place as any to start building my knowledge and experience.  I'll also admit that things didn't go as well as I would had liked and I definitely have learned a thing or two that I won't forget anytime soon. Here is a shot of the three speedo's off of my 1969 CT90's that I will be rebuilding;

How to check a Honda CT90 Ignition Coil

Image
How to Check a Honda CT90 or CT200 Ignition Coil Here is how I perform a basic check of the primary and secondary coils on a 6 volt CT90 ignition coil.  It's also a good idea to check your condenser while you have the coil assembly removed from your CT90 and I outlined how you can check your CT90 condenser at a post here at this link . The coil in the picture below is from a 1969 CT90 I picked up recently.  To check the primary coil I set my meter at the lowest setting to measure ohms and then connect the leads from the meter to the ends of the red and green wires and look at the reading. For this coil the reading is 3.3 ohms which is a little higher then the 2.3 ohms that is used as an upper limit, but should be just fine and is understandable given the coil is 48 years old.

Options for Honda CT90 Paint

Image
Given that most CT90's you come across are over forty years old they all tend to have a few battle scars and faded paint and show their age.  In some ways I like the look of an older bike and think it adds character, but sometimes the damage is such that you really need to remove the rust or fix the damaged plastic and apply a new coat of paint.  If you look hard enough you can find sources where you can purchase paint in the original colors or take color codes to your local automotive paint supply house and have them mix you up a pint, but if your like me and like to keep the cost of your project under control, you might look at the following paint options for your CT90 or CT110. I have also recently updated this post to include a listing on Honda Paint/Color codes at the end of the post.

Honda CT90 or CT200 Rectifier Upgrade

Image
One of the most common items to find not working on old CT90's is the rectifier.  While a CT90 may start with a poor rectifier the rectifiers primary purpose is to take the alternating current from the genorator in the engine and convert that to direct current or voltage to charge the battery. If you are looking for information on how to test your existing CT90 rectifier, I made a post at this link that includes a step by step process for performing the test. While you could always purchase a new rectifier from any one of the outfits that carry replacement CT90 parts, one of the cheapest ways to go is to get a rectifier from Radio Shack that will only cost about four dollars, but does require some minor modifications to the wiring on your CT90.  If your looking to do a complete restoration by all means go out and spend the $15.00 to $30.00 for a replacement rectifier, but if you looking for a cheap but very robust solution, go down to your local Radio Shack and pick up the fo