Posts

Showing posts with the label Carb & Air

A new Batch of Honda CT90 and CT200 3D Printed Parts

Image
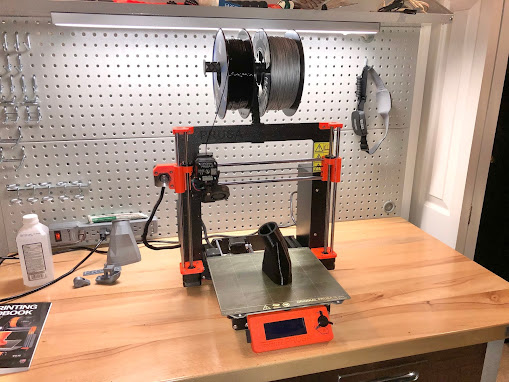
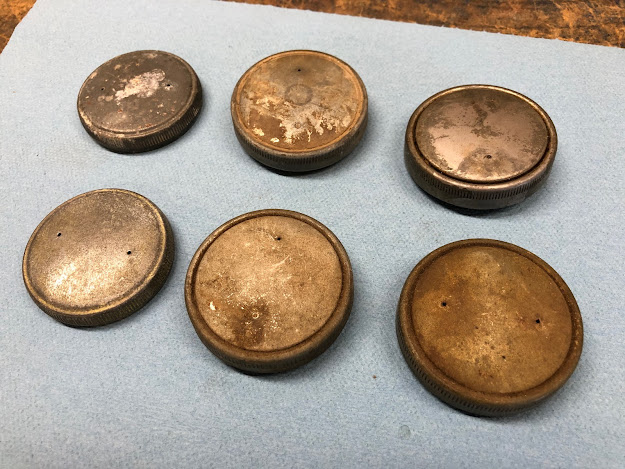
 I'm continuing to find and endless number of opportunities to utilize my 3D printer to make useful parts for my also endless number of CT90 project bikes that I am working on, so I thought I would share a few of the latest CT90 parts that I have designed and printed. All of the designs I share below, I first modeled using my ViaCad 2D/3D modeling program. Related Posts: More 3D Printed Honda CT90 Part Designs 3D Printed CT90 K1 Rear Airbox Snorkel CT90 K1 3D Printed Carb to Air Filter Boot A 3D Printed Valve Spring Compression Tool Speedo Light Bulb Socket Caps On almost every older CT90 I work on (I guess they are all old...) the little rubber caps on that cover and help hold in the bulbs on the base of the speedo are cracked, disintegrating before my eyes or are just missing. I modeled up both a short cap that has a hole for one wire and a taller cap that has a slot in its base that allows two wires to pass through as shown in the pictures below.

3D Printed CT90 K1 Rear Airbox Snorkel

Image
One of the other parts I recently modeled and made a 3D print of is the rubber Snorkel/boot that attaches to the rear of the 1969 K1 CT90's airbox, and that resides in the battery compartment area in the frame when the airbox is installed. Here is a picture of the model I made in ViaCad 2D/3D. The following are a couple of photos of the snorkel that I printed using a flexible TPU filament next to the stock rubber snorkel that I removed from the airbox. The 3D printed snorkel has a nice snow fit when it is mounted to the cylindrical feature on the airbox. At some point I plan on uploading .stl files for my snorkel design to Thingiverse.com and also the Prusa 3D parts library, so others can print the snorkel.  Once I do up load the file, I'll add a link to this post. I hope you found this information useful! Helpful Links  (Shop Manuals, Wire Diagram, Model Information, etc.) Link to page with listing of CT90 and CT200 parts available on Amazon

CT90 K1 3D Printed Carb to Air Filter Boot

Image
I recently picked up my first 3D printer and now have an endless list of things I plan on making on the printer for my CT90's and other hobbies that I have. The 3D printer I picketed up is a Prusa i3 MK3S+ and I purchased it during a Black Friday sale Prusa had run last year.  I purchased the printer as a kit and it was a fun project in itself, but since I got the printer up and running, I've found it to be very capable and I am happy with my printer choice. One of my first projects was to design and print the a replacement for the rubber boot that goes between the carb and air filter on the 1969 CT90 K1.  I've owned sever K1's and I think I had only one where the boot hadn't fully degraded and wasn't falling apart like the one in the picture below. There are replacement boot/filter holders available, but they are almost $70.00 which is pretty pricey.  Most of the time the filter holder portion of the assembly is just fine and its just the rubber portion that ha

Aftermarket Honda CT90 Carburetor Drain Modification

Image
Relocating the Drain on a Aftermarket Honda CT90 Carburetor  I recently picked up an aftermarket carb for one of my CT90's off of eBay that is very similar in design to a Klein 556A carburetor except for one detail and that was the orientation of the drain fitting.  The drain fitting pointed straight down verses straight back and is a common issue with aftermarket CT90 carbs. Related Posts: Adjusting and Jetting a Honda CT90 Carburetor  Here is a picture with the old carb on the left and the new carb on the right.

Honda CT90 and CT200 Gas Cap Teardown

Image
Honda CT90 and CT200 Gas Cap Teardown One of the most over looked elements of a Honda CT90 or CT200 fuel system is the gas cap used on the gas tank.  The gas cap plays a critical role and is designed to allow air to enter the tank and prevent a vacuum from forming as fuel is used by the engine as the CT90 uses a gravity feed fuel system.  While allowing the tank to vent air the gas cap also utilizes a labyrinth design to minimize the gas fumes that can escape from the tank. 

Troubleshooting a Honda CT90 that won't start to start

Image
Most everyone who adopts an old Honda CT90 at some point gets to where the bike won’t start and your first instinct is to start making random adjustments, but no matter how many times you adjust or clean everything the bike just won’t start. After doing this a number of times myself I now try and take a more methodical approach where I follow the sequence of steps I have outlined below, and I’m usually successful at getting the bike running again. Others may take a different approach, but I thought I would share the items I look at and the order I look at them in case this information is useful to someone else dealing with trying to get a CT90 to start. Step 1 – Do you have good compression? Fundamental to getting a bike running is having a reasonable amount of compression, and the more you have the better. If you have a compression gauge put it on and see what you have, but if you have greater then 80 psi that should be adequate to start the bike. If you don’t have a compressi

Listing of Honda CT90 Parts available on Amazon

I have mixed feelings about Amazon as in some respects they are really taking over the world, but in the end they have become the simplest and quickest way for my family and I to get what we need. While Amazon may not always the cheapest place to buy things and some of their third party sellers are kind of questionable, I have generally always had a good experience purchasing item from Amazon. Since I tend to make a lot of my purchases on Amazon, I have also started to buy much of what I need for a number of the Honda CT90 projects I am working on. While Amazon may not have many of the small unique CT90 parts like what is available on DrATV, they do have most if not all of the general parts you end up replacing on a CT90 project bike that has sat on the side of someones barn for the last twenty years. Since it's not always easy to find things on Amazon, I decided to make a page on my blog at the link below where I have collected together a number of the CT90 related items pe

Listing and Links to Old Honda CT90 Patents

Image
I was working in my shop the other day prepping some side cases for paint from one of my CT90's and noticed the "PAT. APPLN. PEND" that is cast into the side of one of the cases just above the high/low range gearbox and selector and I started wondering what if anything, Honda had actually patented on the CT90.

A Way to Soften Up Old Rubber CT90 Motorcycle Parts That Works Well

Image
One of the most frustrating things I have found when working on old CT90's is dealing with the rock and rubber boots at each end of the air cleaner.  When these rubber parts a old, hard, and stiff it can make it a real pain to get in or remove the air cleaner and get access to the carb.  When I first started working on CT90's I found the use of a hair dryer to heat up these rubber parts which made them soften up, but it was only temporary and once they cooled down they became rock hard once again. I didn't want to buy all new rubber parts for my CT90's as I have too many bikes and I get more enjoyment out of doing things myself and learning about different techniques, so I went on a quest to see if there was a good method to permanently soften old rubber motorcycle parts and I came across the following four YouTube video's: Video 1 (I really enjoy all of Ichiban's videos), Video 2 , Video 3 , and Video 4 . After looking at the above videos and actually a

Honda CT90 Air Filter Element Differences

Image
I have a 1971 CT90 that I plan to install a Big Bore cylinder and piston that I picked up from DrATV and thought that since I am adding a bigger piston I should look at doing what I can to open up the air flow going to the carb.  So, I started digging through my parts bin for air cleaner parts and noticed that the elements that support the foam air filter are not all the same and actually have have evolved quite a bit with the most recent configurations designed to allow greater air flow. From the parts I have in my bin, I think I have figured out what air filter element parts I will use with my Big Bore project so that I have the least restriction and therefore the greatest air flow, but since I was spending the time looking at the differences between these parts I figured I would to do a post here to share what I have observed, focusing on the air filter supporting elements used on the K2 and later versions of the CT90 and CT110. The specific parts that I want to focus on are th

Product Review - Huri Air Filter for the CT90

Image
I have two 1969 K1 CT90's that I am bring back to life and as I got to where they we running again, I ran into that unique problem that all the K1 owners run into and that is the rubber boot between the carb and air cleaner is unusable.  The only real alternative is to buy a new one at DrATV/Beatrice for $66.99 or try and find one on eBay at a reasonable price, which was unlikely. My goal with each of these K1's is to build a reliable runner to sell and not really restore them to their original condition, so I was flexible on what I could use for an air filter and I decided to go with a stubby style air filter. After a little searching on Amazon, I found this air filter by Huri that said it would fit on a CT90 and the price was right at $8.25 with free shipping using Prime.  In the end I am happy I purchased this air filter for my 1969 K1 CT90, but for other CT90 models I may have a different recommendation as I explain below. This is a picture of what I received after I

Adjusting and Jetting a Honda CT90 Carburetor

Image
Recently I have had a couple of my CT90's start to give me some issues with how they were running and all the indications pointed at issues with the carb jetting and/or how it was adjusted.  All my CT90's were non running basket cases when I picked them up and I have very much enjoyed bringing them back to life.  Along the way, the process of getting these bikes back up and running involved digging through the pile of parts that I have to find something that might work, so each bike may not have the exact parts that the original model had, which may be part of my problem. Links to Related Posts: My Process to get a CT90 that won't Start to Start The Basic Sequence and Process to Set or Adjust your CT90 Timing Step by Step Instructions for the Reassembly of a basic Two Screw CT90 Carburetor Low Cost Cleaner for your CT90 Carburetor Jets and Screws CT90 Engine Assembly Honda CT200 Engine Reassembly To get to the bottom of my potential carb issues I decided to inves

Low Cost Cleaner for your CT90 Carburetor Jets and Screws

Image
If you do any work on your CT90 at some point or another I think everyone ends up rebuilding their carburetor and one of the most difficult task can be getting your jets clean, especially the idle or slow jet that has a very small orifice. In looking for an alternative to the standard carb cleaner like Berrymans B12 (which I think is about the best carb cleaner you can buy now days) I wanted to try something that hopefully would get down and clean the interior orifice of the jets which doesn't always seem to get clean with just standard carb cleaner, and even with Berrymans B12. I found this post on the web where someone used a toilet bowl cleaner called The Works.  I like The Works and have used it to help de-rust CT90 gas tanks in the past, so I thought I would give it a try. The Works is basically hydrochloric acid and Rodine (Rodine is an acid corrosion inhibitor) and this seemed like it should be effective on the varnish and the other crud that can build up in a carb.

Product Review - Small In-Line Fuel Filters

Image
Most if not all the CT90's that I have picked up have been non-running project bikes that usually have been sitting out in the weather, which in almost every case has meant that the gas tank had some amount of rust.  While I think I do a pretty good job now that I have some experience under my belt at de-rusting tank, in the end there is always a little bit tucked away in some corner that I didn't get, so I always install an in-line filter on both the reserve and primary gas lines going to the CT90's carburetor. Given there is not a lot of space between where the gas lines exit the opening in the frame and the carburetor, I went looking for a nice small in-line filter. The first filter that I tried was a nice compact filter that I picked up off of Amazon.

Step by Step Instructions for the Reassembly of a Basic Two Screw Honda CT90 Carburetor

Image
Anyone who ever buys a CT90 will at some point in owning the bike have to disassemble, clean and reassembly a CT90 carburetor.  The focus of this post is really just on the reassembly of the carburetor.  So after you have disassembled and cleaned all of the parts of your carb and picked up a new gasket set (or reused your old gaskets) you're ready to reassemble your carb.  The terminology I use in my descriptions below is my own and may not be exactly the same as what is called out in a Honda manual, but I hope it is clear enough for you to understand which parts I am working with. Link to related Posts: Adjusting and Jetting a CT90 Carb With respect to a new gasket set, I generally wait until I have disassembled the carburetor before I make the decision to buy a new gasket set.  I have found that most of the time the condition of the old gaskets are just fine and I'll apply a little RuGLYDE to freshen up the elastomeric parts and seals and just really make sure all of t

Simple Method to Check if the Holes are Clear in your CT90 Carburetor Emulsion Tube

Image
One of the most important steps when you are rebuilding or just cleaning your CT90 carburetor is to make sure that you check that all of the small holes along the side of your emulsion tube are free and clear. One simple way that I check my emulsion tube before reassembling it back into my carburetor is to use a LED flash light. Here is a picture of a typical emulsion tube showing the very small holes that exist along the length of the tube above the o-ring.

Dealing with Old Hard Rubber CT90 Carb to Air Cleaner Boots

I have had a couple of CT90's where the rubber boot between the carb and air cleaner and also the rubber elbow in-between the end of the air cleaner and the rack on the back of the bike have been almost rock hard and very difficult to deal with when trying to disassemble or reassemble these installations.  I have found that if I take a hair dryer and heat up the rubber that it will become pliable and enable easier removal or installation.  The softening effect is not permanent and the rubber will go back to being rock hard when it cools, but it does make things workable until you have a chance to go out and buy new rubber boots. I have mad another post on a permanent way to soften up old rubber parts at this link that works very well and recommend you take a look. Helpful Links   (Shop Manuals, Wire Diagram, Model Information, etc.)