Posts

Showing posts with the label Engine & Trans

Honda CT90 Air Filter Element Differences

Image
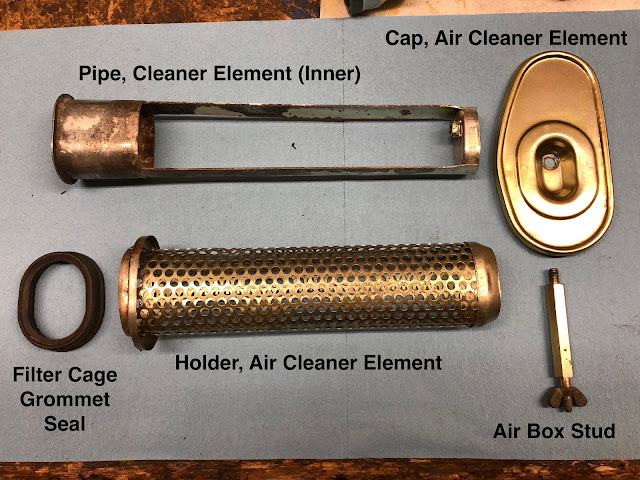
I have a 1971 CT90 that I plan to install a Big Bore cylinder and piston that I picked up from DrATV and thought that since I am adding a bigger piston I should look at doing what I can to open up the air flow going to the carb.  So, I started digging through my parts bin for air cleaner parts and noticed that the elements that support the foam air filter are not all the same and actually have have evolved quite a bit with the most recent configurations designed to allow greater air flow. From the parts I have in my bin, I think I have figured out what air filter element parts I will use with my Big Bore project so that I have the least restriction and therefore the greatest air flow, but since I was spending the time looking at the differences between these parts I figured I would to do a post here to share what I have observed, focusing on the air filter supporting elements used on the K2 and later versions of the CT90 and CT110. The specific parts that I want to focus on are th

Product Review - CT90 Clutch Tool

Image
CT90 Clutch Tool I purchased this clutch tool off of eBay over a year ago and have now used it a number of times and its still going strong and I have been very happy with the purchase.  I mentioned the tool in a previous post related to working on your CT90 clutch , but thought I would share a few additional thoughts here. To rebuild the clutch pack on a CT90 you first need to remove it and that process involves the removal of a special nut that requires a spanner tool to loosen it.  While it may be possible to remove the nut using a punch or some other backwoods mechanic method that stands a high chance of screwing something up, the right way is to purchase a spanner tool given how cheap they are on eBay. I purchased this tool off of eBay for $6.55 and there are several sellers that offer this same tool for a similar price.   The tool is designed to work with two sizes of spanner nuts, 22 mm and 24 mm (what is needed for your CT90).

Product Review - Cylinder Flex-Hone

Image
I had a couple of cylinders that I pulled off of some bikes that I picked up that weren't running and was surprised that they only had light rust, so I decided to order a hone to clean the cylinders up myself without having to send them out to get a new bore. I ended up ordering a Flex-Hone cylinder hone manufactured by Brush Research from Amazon .  The Flex-Hone was 2" (51 mm) in diameter that was 240 grit, and was from the BC Series Flex Hones.  The price of the cylinder hone was $18.00 and it is made in the USA.  

The Basic Sequence and Process to Set or Adjust your Honda CT90 Timing

Image
The primary goal in setting the timing on your CT90 is to have a spark occur at the spark plug due to the points opening up when the piston is at the ideal position before top dead center with both the exhaust and intake valves closed. In the write up below I will share how I go about adjusting the timing on a CT90 and I will be doing this on an engine setting on my bench, but everything I share below is equally applicable for an engine mounted on a bike. Related Posts Cut away of a CT90 Engine - CT90 Engine Exposed! My Process to get a CT90 that won't Start to Start Adjusting and Jetting a CT90 Carb CT90 Engine Assembly Honda CT200 Engine Reassembly Building a static timing light from a free Harbor Freight LED Light To set the timing on a CT90 there are four main steps: 1. Making sure that the timing chain sprocket that drives the overhead cam is installed at the correct position on the timing chain relative to the crank/piston assembly 2. That the valves are adjuste

Honda CT90 Sub-Transmission Reassembly

Image
Updated 11/11/17 to correct the section on installing the high range gear where I left out the step to install the splined washer and retaining ring after the high range gear is installed. I was building an engine for a project CT90 and was reassembling the sub-transmission and thought I would capture the build of that assembly here as a post for future reference and for anyone else to utilize if they happen to be working on this portion of a CT90's engine assembly. Here is an overall picture of all of the parts that go into the sub-transmission assembly

Honda CT90 Spark Advancer Assembly Build-Up

Image
When someone picks up their first CT90 (and they will soon find its hard to own just one...) and its a barn find that doesn't want to run, one of the things they tend to overlook in trying to get the bike running is the spark advancer.  On most older CT90's that haven't been run in a number of years, the spark advancer is usually frozen solid due to corrosion or dried grease and this prevents the bike from running well at anything other than idle. I was in the process of building up an engine for one of my project bikes and had to go through and clean up the spark advancer, so I thought I would share some detailed photos of the spark advancer assembly and the process for building it back up. While I don't plan on providing any details on how to get an old spark advancer assembly apart and clean, I will offer up that solvent, penetrating oil, and a lot of patience will eventually do the trick. Here is a shot of a clean and assembled CT90 spark advancer.  There are

Building a basic Honda CT90 static timing light from a free Harbor Freight LED light

Image
If you ever plan on setting the timing on your CT90, one of the tools you will need is a static timing light. You can go out and buy a simple static timing lights as there are several available, but they are actually very easy to make yourself from just about any small hand held LED light that seem to be readily available everywhere. If you are going to adjust the timing on your Honda CT90 I made a post here with step by step instructions on the process you need to follow . If your in a part of the world that has Harbor Freight and you get the mailers from them on a regular basis, you'll already know that they offer a number of free items with a purchase, and one of those free items is a LED work light/flashlight that is Item # 60566 , which by the way also is a great light to modify into a static timing light for your CT90. I have a number of these lights in my shop as they are cheap/free, provide good light and also have a hook and magnet which come on handy when you'r

CT90 Testing Issue With Harbor Freight Compression Tester and a Correction Factor to Fix the Issue

Image
One of the most basic things you can do to check the health of your CT90 is do a compression check. The compression tester I own is one I picked up at Harbor Freight made by U.S. General.  The compression tester comes as a set that includes the basic gauge and attached hose along with three adapters that fit most typical spark plug applications, including the one that fits the CT90 spark plug hole. While I have never had any issues using this compression tester on any of my cars, when I have used it on my CT90's it always seemed to give me an abnormally low reading even on bikes where I had just redone the top end with a new piston, freshly bored cylinder, and lapped and correctly adjusted valves. I also noticed while spending some time on various on-line sites that other people were having the same issue with this compression tester, so I decided to spend a little time and try to better understand the low results being seen with the use of this compression tester, especially

Shift Drum Stopper Replacement When Doing a Clutch Rebuild

Image
I recently learned about a CT90 failure mode that was new to me of a part called the Shift Drum Stopper that is part of your shift mechanism in your CT90.  I'm also finding that this isn't a failure mode that is all that uncommon and from now on I'm am considering replacing the shift drum stopper whenever I rebuild a clutch on one of my CT90's.  While this approach may be overkill, the part is cheap and its an easy replacement when your in doing your clutch, so I think it is well worthwhile. I recently rebuilt my clutch on my 1975 CT90 and after I put everything back together I took the bike out for a spin in the neighborhood and the bike wouldn't shift correctly, so I pulled the cover off and started poking around.  Nothing jumped out at me as being out of place, so I started surfing the web and came across several postings related to poor shifting and something called the "Shift Drum Stopper".  I went back and looked at my bike and low and behold the

Cleaning CT90 Oil Passages

Image
If you do tear into your CT90's engine to replace a piston or do other work it is always a good idea to take a little more time and make sure any and all oil passages are clean and clear before reassembling the motor. An example would be a part like the overhead cam where each of the cam lobes and bearing journals have a hole where oil is provided to the surface while the engine is running.  Oil gets to each of these holes from a bore that starts at the left end of the cam shaft in the picture below and runs to just underneath the hole that is visible in the right most bearing journal. When you have a part like this out of the engine you really need to make sure that there is no dried up crud in the bore or in one of the oil supply holes and you should be able to look down the bore and see light coming through each of the oil supply holes.

Helpful Link for Working on your CT90 Clutch

Image
Rebuilding Your CT90 Clutch I am getting ready to redo the clutch packs on two of my CT90's and this will be the first time I have ever dug into this part of the bike, so I started digging around on the web and came across this great post someone put together that I thought was really helpful so I thought I would pass on the link: http://hondatrailcts.yuku.com/topic/647#.WOmDJDllChA I hope this is of some help and good luck with your project. Adjusting Your CT90 Clutch To adjust  your clutch you need to loosen the 14 mm locknut and then turn the adjustment screw with a blade screwdriver counter clockwise until you feel resistance and then turn the adjustment screw 1/8 of a turn clockwise. While holding the adjustment screw in place with the blade screwdriver, tighten the 14 mm locknut and you should be good to go.

Simple CT90 Valve Spring Compressor

Image
If you do ever get into doing work on your CT90's engine one thing you will be faced with doing at some point if pulling the valves.  I cobbled together a simple valve spring compressor using a C clamp and a piece of thick walled aluminum tubing I had setting around my garage. I took a piece of the aluminum tubing about 1 1/2 inches long and cut an opening in the side of the tubing about half way through and about 70 percent of the length.  The tubing was a little over an inch in diameter and had about a 3/4 inch inside diameter.

Simple CT90 Valve Seat Check/Inspection

Image
One of the best things you can do to your CT90 is to make sure your valves are seating and sealing to ensure that you have adequate compression. If you have your head pulled off the engine an easy way to check how well your valves are seating is with a small LED light. In the picture below I am holding the light I use and it was a cheap LED light that has a flexible gooseneck that makes it easy to stick into tight places and is a pretty common light you can find usually on the counter at your local auto parts store.